
Manual
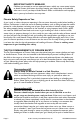
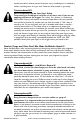
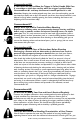
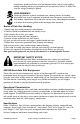
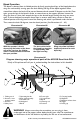
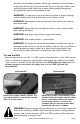
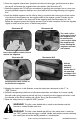
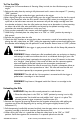
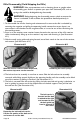

Illustration #4
Diagram showing major operational parts of the AES10B Semi-Auto Rifle
Study of this picture will aid you in understanding the instructions in this booklet.
1. Folding stock
2. Receiver cover
retainer button
3. Receiver
4. Safety lever
5. Operating handle
6. Rear sight assembly
7. Gas tube lock
8. Handguard
9. Barrel
10. Front sight
11. Compensator
12. Bipod
13. Cleaning rod
14. Forearm
15. Carrying handle
16. Magazine
17. Magazine release lever
18. Trigger
19. Pistol grip
WARNING! Always ensure that the ammunition you are using is clean,
undamaged and of the proper caliber, before loading your rifle. The manufacturer
and distributor of this rifle disclaim any liability for the use of remanufactured,
Page 6 © 2011 Century International Arms, Inc. AES10B Rifle Manual
Illustration #1
Bipod Operation
The bipod is released from its folded position by firmly grasping both legs of the bipod above the
wing nuts and carefully turning open the latch holding the legs of the bipod together. When
viewed from above, the latch will be pressed downward and rotated 90 degrees to the left. Once
again, grasp the legs of the bipod in order to rotate them to the support position. Loosen the
wing nuts one at a time, then extend the legs to the desired length, locking the wing nuts once
again. To close the bipod, accomplish these steps in reverse order, being certain to close the
notched portion of the leg bases around the cleaning rod, which is positioned under the barrel.
Then, rotate the latch 90 degrees, into the closed position. (See Illustrations #1 - #3.)
Illustration #2
With the operator’s thumb
depressing the button at the lower
rear of the receiver, the folding
stock is released to be turned into
the open position.
The latch which holds
the bipod legs together
is flipped away from
the right hand leg.
Illustration #3
Wing nuts allow individual
height adjustment for each
bipod leg.
10
8
7
6
5
4
3
2
1
19
18
17
16
14
13
11
9
12
15