Owner’s Manual AES10B SEMI-AUTO RIFLE W/ CARRYING HANDLE & METAL FOLDING BUTTSTOCK & BIPOD Cal. 7.62x39MM Congratulations on your purchase of an AES10B Semi-Auto Rifle. With proper care, maintenance and handling, it will give you long, reliable service.
IMPORTANT SAFETY MESSAGE Children are attracted to and can operate firearms which can cause severe injuries or death. Prevent child access by always keeping guns locked away and unloaded, when not in use. If you keep a loaded firearm where a child obtains and improperly uses it, you may be fined or sent to prison. Firearm Safety Depends on You A gun is only as safe as the person operating it. You can never be overly careful when handling a firearm.
toward yourself or another person. And, never carry a loaded gun in a scabbard, a holster not being worn, or a gun case. Common sense prevails in gun safety! Commandment #3 Don’t Completely Rely on Your Gun’s Safety Treat every gun as though it could fire at any time, even if you are not applying pressure to the trigger. The “safety” on a firearm is a mechanical device which, like any such device, can become inoperable at the worst possible time and fail to function.
Commandment #6 If Your Gun Fails to Fire When the Trigger Is Pulled, Handle With Care If a cartridge or shell does not fire when the trigger is pulled, follow Commandment #1 and keep the firearm’s muzzle pointed in a safe direction. Keeping the muzzle pointed away from your face and anything you do not intend to shoot, wait at least 30 seconds (to ensure that the ammunition is not delayed in firing) before carefully opening the action, unloading the firearm and disposing of the ammunition safely.
should never handle any firearm until you become familiar with the safe handling, loading, unloading and carrying procedures for that particular firearm, as well as the rules for safe gun handling in general. LEAD WARNING! Discharging firearms in poorly ventilated areas, cleaning firearms or handling ammunition may result in exposure to lead and other substances known to cause birth defects, reproductive harm and other serious injury. Have adequate ventilation at all times when shooting.
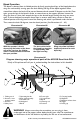
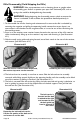
Bipod Operation The bipod is released from its folded position by firmly grasping both legs of the bipod above the wing nuts and carefully turning open the latch holding the legs of the bipod together. When viewed from above, the latch will be pressed downward and rotated 90 degrees to the left. Once again, grasp the legs of the bipod in order to rotate them to the support position. Loosen the wing nuts one at a time, then extend the legs to the desired length, locking the wing nuts once again.
reloaded or hand loaded ammunition. Protect your investment in this fine firearm by using only factory fresh, quality ammunition. The use of improper caliber or low quality ammunition could result in injury, death and/or property damage upon firing. Remember, firearms safety depends on you! WARNING! To minimize the risk of personal injury, death or property damage, magazine loading should only be done when you are about to shoot.
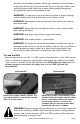
2. Press the magazine release lever (located at the front of the trigger guard) forward, to allow you to pull and remove the magazine from the receiver. (See Illustration #7.) 3. Load the magazine with 7.62x39mm ammunition by pressing the cartridges, one at a time, into the spring-loaded magazine’s feed lips, rear (case head) of the cartridge entering the magazine first. 4.
To Fire the Rifle 1. Keeping the 10 Commandments of Shooting Safety in mind, aim the rifle downrange at the target. 2. Release the safety lever by moving it fully downward until it covers the stamped “F” (meaning “FIRE”) position. 3. Place the trigger finger inside the trigger guard and on the trigger. 4. After aligning the sights on the target, slowly press the trigger rearward to fire the first round. 5.
Rifle Disassembly (Field Stripping the Rifle) WARNING! Wear eye protection, such as shooting glasses or goggles when disassembling your firearm to protect your eyes from tensioned parts, such as springs, that could be dislodged during disassembly. WARNING! Before beginning the disassembly process, check to ensure the firearm is unloaded. To do so, follow the procedures detailed previously in this manual. 1.
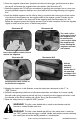
6. Rotate the gas cylinder lock upward, in order to free the gas cylinder tube. Pull upward on the rear of the top handguard to free and remove the tube. Note: No further disassembly is generally needed for routine maintenance. Clean the removed parts, as well as the inside of the receiver, with a good quality gun cleaning solvent. A bronze or nylon bristle brush, dabbed in solvent, will aid the cleaning process. Before reassembly, lightly oil the bolt carrier and bolt. Rifle Reassembly 1.
To Clean the Barrel 1. Obtain a quality rifle cleaning kit and thoroughly review the instructions accompanying it. 2. Follow the rifle disassembly procedures on page 10 of this manual. 3. To clean the barrel, select the correct caliber cleaning brush and attach it to a cleaning rod. 4. Dampen the brush with gun cleaning solvent. Push the brush through the barrel several times. 5.