
User Manual

Installing the Hub
The Hub is the first part of your Kit to be installed. It's in the box marked "1". You'll find the hub power supply
underneath the Hub itself in that box, along with an Ethernet cable.
Positioning the Hub
Your hub is the heart of the AlertMe system in your home. As well as communicating with the internet and
your mobile phone via your broadband gateway, it manages the AlertMe radio network in your home, and
keeps you informed of events and status by playing audio messages. It also lights up white to tell you that all is
well (if you want it to!). You should bear these various functions in mind when choosing a location for your
hub.
As well as being placed so that your AlertMe hub can connect to your broadband gateway and a mains power
socket, your hub should ideally be placed somewhere central in your home, such as a hallway or living room.
This will give you the best radio coverage in your home, and also means you will be able to hear any important
audio messages played by the hub. At the same time, it is a good idea not to put your hub and broadband
gateway right next to each other - try to position them somewhat apart if possible.
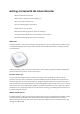
Your hub should be placed the right way up, with the AlertMe logo on top, and shouldn't have other items
placed on top of it. (The top of your hub may get warm during operation.) Also, avoid putting your hub
anywhere which will get very warm, such as an airing cupboard.
To maximise the performance of your hub, try not to put it in the middle of a tangle of wires or in a cupboard.
Also, avoid placing it near any large metal objects, such as radiators, boilers, fridges and so on.
Connecting the Hub
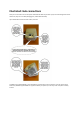
If you are unsure about the connections on the Hub, click here for a labelled picture.
You should connect the Ethernet cable between the socket on the back of the Hub, and a spare Ethernet
socket on your broadband router. For more information about where this might be, or about connecting your
Hub to your broadband router or to Ethernet sockets, click here.
You can position the Hub on any flat surface, such as a shelf, desk, or the floor. Don't put anything on top of it!
Next, connect the hub power supply to the back of the Hub, and plug the other end into a mains power socket.
Your hub should light up; now sign in to the Alertme secure website, if you haven't already.
Note that your Hub power supply and Ethernet cable are in the Hub packaging box, underneath the Hub!
Linking the Hub to your AlertMe website account
If you have not already logged into the AlertMe secure website, now would be a good time to do so! If you
have not registered on the site, you will need to do this now (it is likely that you will have registered when you
ordered your Kit, though). There is more information about registration here. If you are having problems with
the secure website, click here.
Once you are logged in, it's time to connect your Hub with your secure website account. On the website, you
should automatically be taken to the right place in the install process, but if not, go to the MySettings section
(by clicking on the icon at the top right). You should now be in the online install walkthrough. There will be a
few screens of information, which you should read, before you need to do anything.
You will, then, see a box where you should type in your Hub ID Number. This number is printed at the back of
the Hub, just above where the cables plug in. The Hub ID consists of 3 letters and 3 numbers. Once your Hub is