
User Manual


Installing the Button
Before you start here, you should have installed your Hub, prepared all your Accessories by turning them on
and bonding them with the Hub, and installed the Lamp (or all your Lamps if you are lucky enough to have
more than one!). If you have more Lamps to set up, click here to go back and install them.
Where to put the Button
The Button can be used for many things! For now, we recommend that you choose one of our main options,
such as Doorbell. You can always change the function of your Button later on, but it is a good idea to pick
something for it now, before you commit to placing it somewhere in your home. There are general guidelines
about positioning AlertMe Accessories here. For more information about the Button, click here.
The Button may, if you prefer, be attached to your home using screws rather than sticky pads. Read more
about this here.
Repeat the following instructions for each Button you have.
Positioning the Button in your home
All Buttons which you have not yet set up should currently be near to your Hub, and their lights should be off.
On the walkthrough page on AlertMe's secure website you should now be able to see all the Accessories you
have not yet set up, including the Button you are about to install. If you drag a Button icon on the website to
the box on the right hand side, you should see the light on one of the Buttons near your Hub start to flash on
and off regularly. This is the one to install now.
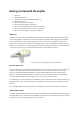
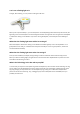
Take this Button to where ever you wish to put it. As you move around your home, the light on your Button
may continue to flash, or the light may start to blink twice every few seconds. When the light is blinking, that
means that you are not in a good location to install your Button, as the radio signal is not good enough. Don't
panic! There are two reasons the light might do this. One is that you are in a slightly bad spot for the wireless
network; you may find that moving the button just a few inches one way or another is all it takes to get to a
better place. If moving it around does not work, try another location. If you cannot find a good spot anywhere
near there, it might be that you are out of range of the Hub. Moving your Lamp nearer to where you want to
install this button might be the answer - read more about tweaking your system for better wireless network
coverage.
As you position your Button, you should make sure you select a location where the Button light is flashing
continuously. You may wish to place the Button somewhere, and then watch it for 5 to 10 seconds to ensure
that it continues to flash, confirming that this is a good position where it can be in constant contact with your
Hub. Once you have found a good spot, fix the Button in place with a sticky pad (read the instructions first!).
If you have any problems with finding a position for your Button where the light stays flashing, click here for
help. If you have any problems deciding where to place the Button, or actually fixing it in place, click here.
Naming the Button
Now you should have successfully positioned the Button in your home.
On the website, click OK to say you have positioned your Button; you can now name it in the box. You can give
the Button a name, such as Master Bedroom Panic Button or Kitchen Doorbell. The name is entirely up to you;