
User's Manual

© 2015 CentraLite. All rights reserved.
Data Sheet: 3-Series Smart Garage System (3220) Page 3 of 5
IMPORTANT SAFETY INSTRUCTIONS
• Install device in accordance with included
instructions and local laws, building codes, and
safety codes.
• Professional installation is recommended for this
product.
• If warning strobe light or audible indicator is not
functioning correctly, immediately cease use of this
device.
• To reduce the risk of electric shock, this equipment
has a grounding type plug, that has a third
(grounding) pin. This plug will only t into a
grounding type outlet. If the plug does not t into
the outlet, contact a qualied electrician to install
the proper outlet. Do not change the plug in any
way.
• To reduce the risk of injury to persons–Only enable
remote open and close feature when installed with
a sectional door.
• This device not is not equipped for permanent
wiring. Contact licensed electrician to install a
suitable receptacle if one is not available.
WARNING!
To reduce the risk of severe injury or death:
- READ AND FOLLOW ALL INSTRUCTIONS
- Never let children operate or play with door
controls. Keep the remote control away from
children.
- This operator system is equipped with an
unattended operation feature. The door could
move unexpectedly. NO ONE SHOULD CROSS
THE PATH OF THE MOVING DOOR.
SAVE THESE INSTRUCTIONS
Getting Started
Step 1: Open ZigBee Network for Joining
Using your controller or hub’s interface, enable the
ZigBee network for joining.
Step 2: Plug-In Smart Garage Controller
Plug the Smart Garage Controller into a receptacle
near or inside your garage and it will immediately
begin searching for a network to join.
Step 3: Finish Joining at Hub (optional)
Some hubs and controllers require additional steps
such as naming or categorizing the device.
Step 4: Unplug Smart Garage Controller
Remove the Smart Garage Controller from the
receptacle. It’s now time to mount the device in the
garage.
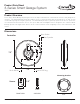
Step 5: Install Mounting Bracket to Ceiling
Using the included anchors and screws, the controller
bracket should be screwed into the garage ceiling
(directly above the garage door motor) securely,
using all three included mounting screws.
Step 6: Attach Smart Garage Controller
Fit the Smart Garage Controller into the mounting
bracket and twist until it locks into place.
Step 7: Wiring
Using the included control wires, insert the wires
rst into the Smart Garage Door quick-connect
terminals, then insert or screw them into the garage
door motor’s control and light terminals. Now plug
the Smart Garage Controller’s power cord into the
ceiling receptacle.
Step 8: Attach Smart Garage Sensor to Door
Using the included hardware (screws or adhesive
tape), install the sensor mounting bracket to the
bottom panel of your garage door. If you have a
non-paneled or solid door, install the mounting
bracket within 18 inches of the oor. Finally, clip the
Smart Garage Sensor into the mounting bracket.
The installation is complete.
Note: It is recommended that you complete the joining process before mounting the Smart Garage Controller. The Smart Garage Controller comes pre-joined to its Door Sensor.