
User's Manual
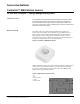

Centralite™ EMS Motion Sensor
Instruction Bulletin
MOUNTING THE MOTION SENSOR
Listed below are two methods for mounting the motion sensor.
Method 1 - Using a Drywall Screw
1. Remove the cover of the motion sensor and remove the
battery if necessary.
2. Select a suitable location to mount the motion sensor. This
location should provide good unobstructed coverage of the
area for which the sensor will cover.
3. Insert a 1 in. (25.4 mm) sheetrock screw (not provided) into
the pilot hole in the sensor's back plate (located in the battery
compartment) and install motion sensor onto the wall.
06/2010
Method 2 - Using Double-sided Removable Tabs
1. Remove the cover of the motion sensor and remove the
battery (if installed).
2. The Motion Sensor base should be mounted using
Double-sided Removable Tabs by 3M
®
(or equivalent). Follow
the mounting tab manufacturer's instructions for adhering or
removing the tabs to/from the back of the unit and mounting
surface.
3. Select a mounting area for the Motion Sensor that is free of
heavy dust or high humidity and provides a good
unobstructed coverage of the desired coverage area.
After sensor is mounted install the battery and replace the outer cover.
PROGRAMMING
Restoring Sensors to Factory Default State
The Motion Sensor must be restored to the factory default state before
capturing it to the Room Area Network (RAN).
Follow the steps below to reset the Motion Sensor to the factory default state.
1. Open the Motion Sensor by pressing the access release tabs on the sides
of the sensor.
2. Remove and retain the battery (if installed).
3. Locate the Programming Button found on the center of the circuit board.
While pressing and holding the Programming Button, install the battery.
The LED will blink.
4. After the LED stops blinking, release the button. The Motion Sensor is now
restored to the factory default state.
Capturing the Sensor to the Room Area Network (RAN)
1. With the thermostat Room Area Network (RAN) open for capturing, press
the Programming Button 3 times. The LED should begin to flash several
times. Verify that the sensor is successfully captured and indicated on the
thermostat.
2. Test the sensor using the thermostat diagnostic/test screen to make sure
the sensor is reporting accurate occupancy messages.
Replace the cover and verify that it is snapped fully onto the base. Refer to the
Centralite™ Energy Management System User's Guide for more information on
programming.
SPECIFICATIONS
Power 3V CR-2 Lithium Battery
Temperature range -4° F to 140°F (-20°C to +60°C)
Communications 2.4 GHz, 16 channel spread spectrum radio frequency
© 2010 Centralite Systems. All Rights Reserved.
2