
Owner's Manual
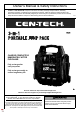
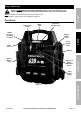

Page 9H&(%$*4.8"4,7%N'*#$"&8#O%/7*,#*%4,77%PMQQQMQRRMSTUT1Item 58979
J=H6DE@B6>=DF@VA=FVD6V=V;6 J6DIB
A,"8$*8,84*%,89%J*(Z"4"83
% B(&4*9'(*#%8&$%#/*4"2"4,77K%*a/7,"8*9%"8%$."#%5,8',7%5'#$%
+*%/*(2&(5*9%&87K%+K%,%N',7"2"*9%$*4.8"4",81
D@%B>6!6VD%J6>F@IJ%FV`I>E-%%I8/7'3%$.*%`'5/%B,4_O%$'(8%$.*%B&)*(%J)"$4.%&22%,89%,77&)%`'5/%B,4_%$&%
4&&7%4&5/7*$*7K%+*2&(*%/*(2&(5"83%,8K%"8#/*4$"&8O%5,"8$*8,84*O%&(%47*,8"83%/(&4*9'(*#1
1. X6H@>6%6=;<%IJ6O inspect the general
condition of the Jump Pack. Check for:
• loose hardware,
• cracked or broken parts,
• damaged electrical wiring or cable insulation, and
• any other condition that may
affect its safe operation.
2. Keep unit clean and clamps free
of dirt, debris, or grease.
3. For longer working life, protect Jump
Pack from sunlight and moisture.
4. =HD6>%IJ6O wipe external surfaces of
the Jump Pack with clean cloth.
5. ;@VD=FVJ%V@VMJBFCC=XC6O%J6=C6G%
C6=GM=;FG%X=DD6>E1%%X=DD6>E%AIJD%X6%
>6;E;C6G%@>%GFJB@J6G%@H%B>@B6>CE1
X,$$*(K%>*/7,4*5*8$%,89%G"#/&#,7
C6=G%X=DD6>E%AIJD%X6%>6;E;C6G%@>%GFJB@J6G%@H%B>@B6>CE1
W=>VFV?[%%D&%/(*Z*8$%9,5,3*%&(%#*("&'#%"8L'(KO%(*/7,4*5*8$%+,$$*(K%5'#$%+*%"9*8$"4,7%$&%&("3"8,7%+,$$*(K1%
Replace the Battery when the red light comes on while
pressing the Battery Test Button after recharging.
1. Remove all ten screws from the back
of the case and lift off the panel.
2. Lift out the Battery without
damaging the circuit board.
V&$*- Notice how the red and black cables connect
to the old battery and make sure to keep them
in place, connecting them to the new battery.
3. Detach the recharging wires and battery
cables from the battery terminals.
4. Position the replacement battery with the
label facing out, and make sure the (*9%ekf
recharging wire and battery cable is attached to
the /&#"$"Z*%ekf battery terminal. Connect both
of the recharging wires and battery cables.
5. Carefully slide the battery into the compartment
without damaging the circuit board.
6. Replace the back panel and the screws.