
Installation Guide
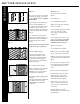


round cut installation
round cut installation
Fig.6
65
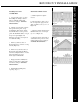
For 2nd and subsequent courses,
align Left Side Flange with nearest
Alignment Line that allows proper fit
and overlap of shingles. Be sure to cut
panel to stagger vertical laps.
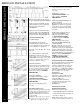
Second Course
(and all even courses)
a. Round Cuts – Measure appropri-
ate distance from the Left Side Flange
of panel (allowing for staggered verti-
cal laps) and cut (see Figure 13)
b. Round Cuts –Align Left Side
Flange with nearest Alignment Line
of course below that allows for proper
fit into corner post or J-channel
(see Figure 14).
c. Engage lock securely into con-
tinuous top lock of course below
d. Pull up tight and nail according to
“NAILING PROCEDURES”.
e. Continue installing full panels in
the course, following Steps c-d.
f. To finish course, refer to the previ-
ous section titled “Last Panel on Each
Course”.
Third Course
(and all odd courses)
a. Measure the distance from the
first RIGHT Alignment Line “0”
of the course below to the edge of the
corner post or J channel plus
¼˝ (see “A” on Figure 14).
b. Engage lock securely into con-
tinuous top lock of course below
c. Round Cuts – Align Left Side
Flange with nearest Alignment Line
of course below that allows for proper
fit into corner post or J-channel (see
Figure 15).
d. Pull up tight and nail according to
“NAILING PRODEDURES.”
e. Continue installing full panels in
the course, following Steps c-e above.
f. To finish course, refer to the pre-
vious section titled “ Last Panel on
Each Course” on page 49.
Fig.13
Fig.14
Fig.15