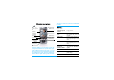
Discover your phone Back of the phone: speaker & Camera The device is meant to be connected to GSM/GPRS networks. 262,000 colour , keys Volume & zoom key Hard key Left soft key USB Port/ charging & headset How to... main screen Switch the phone On/Off Long press)。 Enter your PIN code Enter your PIN code using the keypad and press,to confirm.
Quickly return to idle when browsing menus Short press ). Access the menu functions Press ,, and use the stylus to enter the submenu. Repeat the process until you reached your desired function. Active the camera/video function In idle mod, long press camera key. Switch On/ Off Press and hold )。 Enter PIN code Enter PIN code with the keypad and press , to confirm. Hard keys ) Hang up Key • • • • ( Answer key • • In menu or edit mode, short press to return to idle mode.
Side camera key • • • In idle mode, short press to enter the camera, long press to enter video camera. When in camera/video camera preview mode, short press to take a photo. When in video camera mode, short press to start/end recording. When the camera/video camera is activated, long press to exit. The 4 hard icons are available in idle mode. When not in idle mode, only the Main menu and Dial screen hard icons are available. During a call, only the Dial screen hard icon is available.
out the corresponding operations (such as menu page header, menu items, lists, left and right softkeys, options menu, function keys, text input area, selection area, pull-down menu box, selection box, etc). You will not be able to use the touch screen in some cases, as they are not able to replace the keys to carry out certain operations. The screen will display lists and menus that can be selected with the stylus pen. You can select an item, move up and down or select a few items simultaneously.
Table of contents 1. Getting Started ........................................... 3 2. 3. 4. 1 Insert the SIM card .......................................... 3 Switching on the phone .................................. 5 Charging the battery ....................................... 5 Setting hotkeys ................................................. 6 Calling ............................................................... 7 Answer and end a call ..................................... 7 Call handsfree ......
Phone memory ............................................... 42 Memory card ................................................... 42 10. Business ...................................................... 44 Calculator ........................................................ 44 Money Converter .......................................... 44 Organizer ......................................................... 44 World Clock ................................................... 45 Sound recording .......................
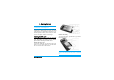
1. Getting Started Please read the safety instructions in the "Precautions" section before use. To use your phone, you must insert a valid SIM card supplied by a GSM operator or retailer. The SIM card contains your subscription information, your mobile telephone number, and a memory in which you can store phone numbers and messages. Inserting the SIM card Follow the steps below to insert your new SIM card. Remember to switch off your mobile phone before removing the back cover.
Insert the SIM card Replace the battery Insert your SIM card under the metal clip holder, until it stops. Make sure that the clipped corner of the card is in the correct corner and that the gold contacts are facing down. Slide the battery into its slot, metallic connectors facing downwards, until it stops. Then lock it by pushing it downwards.
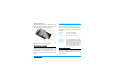
Replace the back cover Align and hook the back cover to the left side of the phone and press down the back cover until it locks into place with the right side of the phone. Remove the protective film covering the screen and the camera lens before using the phone. Switching on the phone To switch on the phone, long-press the ) key. Enter the PIN code if required. A PIN code is a 4- to 8-digit secret code for your SIM card. It is preconfigured and communicated to you by your operator or retailer.
Once the battery and battery cover are back in place you can charge the phone. Pull away the protective rubber cap covering the charger connector. Plug in the connector as shown below. Then plug the other end into a main AC power socket. Keeping the charger plugged to the mobile when the battery is fully charged will not damage the battery. The only way to turn off the charger is to unplug it, so use an easily accessible AC power socket. You can connect the charger to an IT supply (Belgium only).
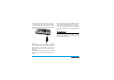
2 • Calling Make a call From the idle screen 1. In idle mode, enter the phone number using the keypad. To correct an error, press R C. 2. Press ( to dial. 3. Press ) or R End call to hang up. For an international call, long press * to enter the "+" sign for the international prefix. Using the phonebook 1. Press - in idle mode. 2. Select a contact in the list and press (: the selected number is dialled.
Options during a call To record a conversation during a call, select Record dialogue and press ,. Press, again or L Save to end the recording: an edit window allows you to assign a name to the recording, which is then available in Multimedia > Sound album. Depending on memory capacity , recordings can be of up to 30 minutes in total. During a call, press , or L Options to access the following options. If you select Mute and then Record dialogue, only the caller’s voice is recorded. 2.
Quickcall MMS Foto talk The Quickcall feature allows you to set your four most frequently dialled numbers. You can then quickly call one of them by selecting the corresponding icon or picture on the screen. This feature allows you to send a picture via MMS and to add a sound recording to it. The picture can be selected from the Picture album or can be a picture you have just taken with the camera. 1. Take a picture, then press Menu, or select a picture from the Picture Album, then press ,or LOptions.
Making a second call You can make a second call during an active call or with a call on hold. While on the phone, dial a number (or select a contact in the phonebook) and press (. The first call is put on hold (the number is displayed on the bottom of the screen) and the second number is dialled. You can then press OK to access the options among which are: • Switch calls to toggle between calls (you can also press < or > to switch calls). • Transfer to connect the two calls.
Conference call Subscription dependent. A conference call is activated by making several outgoing calls or from a multiple call context. It allows you to speak with up to five people at the same time. 1. Make a first call with someone, then a second one (see above). 2. Press , or Options and select Conference. Repeat the process until five members are connected. 3.
3 • Text Entry Text can be entered in editing screens in two different ways: by using T9® Predictive Text Input or basic text input. The techniques for using these two methods are discussed below. T9® text input T9® Predictive Text Input is an intelligent editing mode for entering text on a mobile phone. It allows you to Tegic Euro. Pat. enter text more quickly by anticipating App. 0842463 the word you want to enter based on the keys you have pushed.
Basic text input Press * to switch from T9® to basic text input. This method requires multiple key presses to reach the desired character: the letter "h" is the second letter on the 4 key, so you must press it twice to enter "h". Short press R Cancel to clear one entry, long press to clear all text. Example: how to enter the word "home": Press 4, 4 (GHI) 6, 6, 6 (MNO), 6 (MNO), 3, 3 (DEF). Press , when the message is completed.
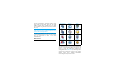
Handwriting recognition In handwriting recognition mode, you can enter Chinese characters, English letters, numbers, symbols (including punctuations) by means of handwriting recognition. 1. Tap on the touch screen to enter the handwriting recognition mode. 2. Tap the corresponding icon on the touch screen to toggle between Chinese character input mode, English letter input mode, symbol input mode and number input mode. 3. Write the text with your stylus pen.
from the input line and tap it to replace the one in the input area. Input Symbols 1. Press to enter the symbol input mode. 2. Write a symbol with your stylus pen on the touch screen. 3. You will see the recognized result on the input area. 4. To check for more symbols, press or. Choose one of the candidates from the input line and tap it to replace the one in the input area. . Input numbers 1. Press to enter the number input mode. 2. Write a number with your stylus pen on the touch screen. 3.
4 • Entertainment Lunar Calendar This menu gives you the correspondence between Gregorian and Chinese calendars by displaying the corresponding date in lunar mode from a selected Gregorian date. Western Horoscope, Lunar Calendar and Chinese Festival features are available only in the Chinese language menu (see page 27). Your phone may or may not have the Chinese Language menu depending on where the phone was purchased. Features requiring date & time information (e.g.
Stopwatch L Select When you enter Stopwatch menu, the screen will display Stopwatch with a start time as 00:00:0. Press L Start or , to start the Stopwatch timer. The soft keys will become Start/Stop and Reset. Press R Reset to reset the Stopwatch. Then R Back to exit. Main menu > Entertainment > Games > Default games L Select L Select L Options Open the game list L Select Countdown When you enter Stopwatch menu, the screen will display Stopwatch with a start time as 00:00:0.
* and # To start the game by throwing the ball left or right. 0 To pause the game up to 2 min. (after which the screen returns to idle mode and the game is lost).
5 • Browser Items in Browser menu depend on the type of service you have subscribed to and/or the service provider you use. Consequently, some of the menus described below may not be available. If your phone was pre-configured, you will not need to change the settings described in this section. The services provided may involve making a phone call or sending an SMS for which you may be charged. Contact your network operator for details. WAP Your mobile phone is WAP enabled.
Bookmarks Bookmarks folder options This menu allows you to manage a list of your favorite WAP sites, much as you might do with a "Favorite" or "Bookmarks" menu in an Internet browser. In this way, you do not have to enter the address for a site whenever you want to visit it.
L Options Options under each Bookmark include: • Edit • Move • New Folder • New Bookmark • Delete • Delete all IP address To enter the IP address of your WAP service Port To enter the IP port number of your WAP service. This is usually port number 9201. Homepage To enter a WAP site address to which you will connect directly when connecting using the related profile. Linger time When you have reached the inactivity timeout (in seconds), your phone will automatically close the WAP connection.
GPRS profiles To toggle between different GPRS profiles that you have defined in Connectivity. site for browsing or downloading multimedia files into your handset. WAP push setting WAP Push is a service for the asynchronous delivery of content to the mobile device. Use this menu to turn on or off the reception of message broadcast on your network and/or from your service provider. Or you may specify to allow SMS centers from specific area to send you the messages.
6 • Music Playlists This feature allows you to edit your favorite song list. To edit your playlist: This feature allows you to download music from the network, save the sound files, edit your play list, and play the music. The phone can support MP3 and AAC format. Tracks This feature allows you to play downloaded music from either the Phone memory or Memory card. For example, to play tracks from an inserted mini-SD card, select the Tracks option and then on the next screen select Memory card.
Your mobile phone is supplied with many sounds and pictures. You can only delete sounds or pictures in the My melodies or My images folders, e.g. to free memory space for your own sounds and pictures.
7 • Camera Your mobile phone features a digital camera that allows you to take pictures (up to 1.3 Mega pixels) and record short videos, store them in your phone, use them as wallpaper or send them to your friends. Side keys + and - Zoom in/out (when the camera is active) Zoom behaviour depends on camera resolution setting. The lower the resolution, the higher the zoom factor. Switch between camera or video mode.
Camera option menu When the camera mode is activated and before a picture is taken, you can change a number of settings by pressing L Options. Options Description Preview screen Select to view with a Large/Small screen. Picture resolution Adjust from five image sizes: 160X120, 320X240, 640X480, 800X600 and 1280X1024. Picture Quality Select among three image quality: Super fine, Fine and Normal. View pictures Select to view the pictures taken. Flash light To activate or deactivate the flash mode.
When the photo album is full, a warning message will pop-up. +/- Adjust brightness recording mode) Video mode +/Camera side keys Zoom in/out (when in recording mode) L Stop Stop recording and save the video right after the shot L Open the option menu This option allows you to record short videos, which you can play, save in the phone, or in an inserted memory (mini-SD) card, or send to someone via MMS or e-mail. Note that the phone's internal memory can store approximately 350KB of video.
Video length Select from MMS length , Maximum length or Unlimited. recording and save the video. Once you have saved the file, you can then press L Options to access the following list: To set the video length as Unlimited, please make sure that you have selected the Memory Card option from Settings > General > Default Storage. Video resolution Select video size: 352x288 or 176x144 Video quality Select image quality: Fine and Normal. View videos Select to view the recorded video.
Video menu options Options Description Play Play the video that you just recorded. Send Send the video file. Record new video Return to video mode to record new videos. Delete Delete the video clip. When video album is full, a warning message will pop-up.
8 • Messages name. You can also select an existing topic in the list, which you can rename or delete. You can enter up to 15 different topics in the list. To obtain the codes corresponding to the different topics, contact your operator. Broadcast SMS This menu allows reception of SMS transmitted to all network.
Rename profile To rename an account from its default name. If one of the accounts has been pre-configured, it may be locked, in which case it cannot be renamed. Email server To configure the settings needed to connect to your e-mail service. If you wish to use a GPRS connection to access your e-mail, you may need to use the SMTP server of your mobile service provider to send e-mails. POP3 port The port number on the POP3 server. This is usually port 110.
Phone number This is the number your mobile phone dials to establish a connection. First choose ISDN No. or Analogue No. (depending on your network operator) and then enter the Phone No. provided by your operator. Login & Password The login and password provided by your GSM network operator to access this service. Auto disconnect Enter an inactivity time-out value after which the phone will automatically end the call (if a connection was in progress). The value must be over 30 seconds.
3. Select a header, and press , to display the Details. The following status icons may appear to each header: The e-mail size is too large (over 50 Kb), it cannot be downloaded. The e-mail is marked to be deleted (see µ⁄ 33“Š). 4. If there is no icon next to the header, you can press , and select Get mail to download the e-mail. Repeat this operation to download each e-mail corresponding to each selected header.
5. Select an e-mail header and press , to access the following options: Add to contacts To add the sender’s e-mail address to your phonebook, even when you haven’t yet downloaded his e-mail. Select to create a new contact, or a name in the list to add or change the e-mail address. You must have selected the phone phonebook in this case; this menu item will NOT appear if you selected the SIM phonebook. Delete To mark the e-mail to be deleted (select this option again to unmark it).
Add media Allows you to design your message. Enter the subject and text, then press , to access the next options: • Add sound or Add graphic to attach a sound or a picture to your e-mail, • Send now to send it to the selected recipient(s), • Modify to redesign your e-mail. 2. Enter a number or select a contact and press ,, then one of the following options: To write a new message. Last message You can only attach one picture (JPEG, GIF or BMP) or one sound at a time.
You can send up to two attachments of two different types together with your SMS. Images and animations and pictures are exclusive: if you first select an animation and then an image, only the image will be taken into account and vice-versa. Store number To save the number of the sender if it is attached to the message. Delete To delete the selected message. Reply by SMS To reply to the sender. Copyright protected pictures and sounds cannot be sent by SMS.
Move to archive To store messages in the phone memory. You can then consult them in Messages > SMS > Archive. Moving a message to the archive deletes it from the SMS Inbox list. Edit SMS To edit, modify and resend the SMS to someone. Store melody To save the melody that was sent with the SMS. This menu is only visible if there is a melody to extract. Store graphic To save the graphic and/or animation that was sent together with the SMS. This menu is only visible if there is an image to extract.
Settings This menu allows you to configure the SMS settings. The options are: SMS chat When On, allows you to display received SMS on the idle screen. You can then quickly reply to a message received by pressing ,, entering your message in the edit screen, and pressing , again. If you receive an SMS while you are reading one, you can reply to the first one before reading the second. Alternatively, you can press Back to exit the first message. The second message then appears on your screen.
Archive This menu allows you to consult all the messages stored in the phone’s memory using the Auto save SMS or Move to archive options. The item allows you to delete all SMS at once. When a message is displayed, press , or LOptions to access the following options: Delete, Edit SMS, Forward to, Call back, Call handsfree. MMS Your mobile phone can also send and receive MMS (Multimedia Messaging Service) messages. With MMS you can send messages that contain pictures, sounds, and text.
screen. Recordings previously saved cannot be sent via MMS. The following options are available when creating new MMS messages: Save as template To save your message as a template, that you can use as a basis for other MMS (e.g. "Happy birthday" type of message. Add Slide Preview MMS To preview the slide show you have created. Slide duration To change the value of slide duration set in Settings > Application settings and to set a delay between each slide.
Next / previous slide To move to the next or previous slide. You can also press < or > when viewing the MMS in manual mode. Note that this option only appears if the MMS contains more than one slide. Save picture To detach the picture of the current slide and save it in the Picture album. Save sound To detach the sound of the current slide and save it in the Sound album. Close To close the MMS and go back to the list of options.
Application settings Retrieval mode Allows you to choose from: • Manual: you connect manually to the server by selecting a notification in the Inbox, selecting Read to download, then Play. • Automatic: new MMS are directly placed in the Inbox. Select the MMS and press > to play it. This mode roaming. is deactivated when Validity period To select how long your MMS will be stored on the server, from 1 hour to 1 week (maximum).
9 • My Files R Options +or- Open the Options menu. Select Paste here. Phone memory his menu allows you to manage your files by storing into different folders. Moreover, you may use Memory status to get the memory capacity information of your phone or mini-SD card. Managing files You may cut, copy, and paste the files in My files. However, the phone can’t copy big files from miniSD card to internal memory (up to 350KB).
Please see Settings > General > Default storage µ⁄59“Š to change the default location storage.
10 • Business Calculator accuracy is to 2 decimal places and is rounded up to the higher decimal figure. Money converter This menu contains features and options designed to help you keep you organised and informed while on the move. Calculator Your phone has a built-in calculator that you can use to perform basic calculations. Numbers are entered with the keypad and operators with the navigation keys as indicated in the table below: Addition Press > or the * key.
2. Enter the starting and ending date and time of the event and name it (e.g. "Meeting with Smith"). 3. Set a reminder and a frequency: alerts will be triggered at the chosen time. Delete To delete the selected event. Change To change the selected event. Send by infrared To transmit the selected event to another infrared-compatible device. The reminder only applies to Meeting and To Do events. It will be updated when changing time zones (see °×World clock°± below).
but will be replaced with the standard International clock wallpaper. World clock Activate this option if you want to display both the local time and the time of another time zone on the idle screen. Press + or - to set the option On or Off. When On, the new menu item Switch local and foreign allows you to display the zone of your choice. This feature is not available when the option No clock is selected in “Clock display” on page 53.
When you select a sound file, it is played automatically in a loop. Press , to access the options. You can Set a reminder, Play recording, Rename or Delete it, Send by Email, Infrared or MMS (see µ⁄25“Š°×Sound album°± for details), Set as ringer or As SMS/MMS ringer. The alarm clock will ring even if your mobile phone is switched off and/or the ringer volume is set to Silent. When the alarm rings, press any key to stop it or close the phone (except if the snooze mode is on, see below).
Settings Select this menu item and press L Select to access the options described below Notification To select the way you want to be notified of a rejected call or SMS: with a Status icon displayed in idle screen or an Icon feedback. You can also choose No notification. Activation Allows you to set the firewall option On or Off. When On, your mobile phone will reject all calls and SMS received from the people listed in the blacklist.
11 • Contacts Your mobile phone only manages one phonebook at a time and will ignore the information relative to the other one, e.g. if "Smith" is present in both phonebooks and if you delete it in the phone, it remains unchanged in the SIM. Contacts are stored in one of the two available phonebooks: in your SIM card (number of entries depending on capacity) or in your phone (up to 999 names). When entering new names, they will only be added to the phonebook you have selected.
Adding contacts to the SIM phonebook 1. 2. Select in the list. Enter the name and the number of your choice, then the type of number allocated to the name (Phone, Fax or Data) and press,to store this name in your phonebook. A number is limited to 40 digits, depending on your SIM card. Entering international prefix, country and area codes allows you to dial a number from any location. Adding contacts in the phone phonebook Select in the list.
# Press this key then enter the first letters of the name you are searching, and press,to go directly to that name. access a second set of additional options, among which are: Make default The first number you enter becomes the default number which is automatically dialled when pressing (. This option allows you to set another default number.
Alphanumeric fields (note and e-mail) can only be changed or deleted. Adding picture and sound to contacts Contacts stored in the phone phonebook can be personalised with a picture and/or a sound. This function is only available when you select the onboard phonebook. Select a contact and press ,or L Options. In the list, choose Select picture to add a picture from the Picture album and choose Select melody to open the list of ringers and add a melody.
12 • Profiles Personalise settings Personalise settings includes the following: Options Description Alert type You can set your phone to operate with the following sound profiles: • Normal • Headset • USB Cable Select the type of alert from Ring only, Vibrate only, Ring & Vibrate, Vibrate then ring and None. Key sound Toggle to turn on/off the key sound. • Outdoors Ringtones Select ringtone for All calls, All contacts calls, Alarm, Appointments, Messages, Cell info and Group 1-10.
13 • Connectivity Your phone allows you to connect to a variety of external devices via infrared, Bluetooth, USB, CSD, or GPRS. This menu provides you with more features to set up the connection with these external devices. Infrared You can set up the phone to receive data via infrared wireless communication, and transfers of files up to 350KB. To use an IR connection, the device with which you want to establish a connection must be IrDA compliant.
Making a Bluetooth connection To make a Bluetooth connection, enter the main menu, select Connectivity, then select Bluetooth. On the Bluetooth screen, select Activate. Next, select Search for devices. When the list of devices appears, select one to make a connection with it. If you do not use the Bluetooth feature for some time, you should deactivate it in order to conserve battery power. Bluetooth menu Options Description Activate To turn on/off the Bluetooth feature.
+or- USB drive Webcam Connectivity Navigate through USB drive, Webcam and PC software. Your mobile phone will then behave such as a USB drive, a Webcam or will perform PC connections with Mobile Phone Tools. If you connect your phone to PC via PC software, you can transfer files up to 350KB. If you connect your phone to PC via USB drive, you can access your mini SD card and the transfers file size is unlimited until your memory is full.
Preferred networks Select your preferred network or press L List to change network. Login To enter a login name. Select band Five bands are available: 900MHz, 1800MHz, 1900MHz, 900/1800MHz and 900/1900MHz. Password To enter the password. GPRS profiles Memory card The phone has a mini-SD memory card slot to increase the phone’s memory. The phone supports FAT16 mini-SD cards up to 512MB with guaranteed performance and quality.
14 • Calls Most options described in this chapter are operator and/or subscription dependent and require either a PIN2 code or a phone code. For more information on PIN codes, see °×Security°±µ⁄58“Š. Call history This menu provides you with a list of calls you have missed, answered and made. The calls include All calls, Missed calls, Answered calls and Outgoing calls, which are displayed in chronological order with the most recent first.
Call services This feature allows to you set Time & cost, Call waiting, Hide ID, Caller ID and Cost settings. Please refer to the following Call services menu. Call services has the following options: Time & cost: Display the duration of your calls and their charges: Call duration, Total incoming, Total outgoing, Cost left and All voice calls.
15 • Setting General This menu allows you to configure some general settings: This chapter describes the contents of the Settings menu. It is here that you can access the options (sounds, time and date, security, etc.) to configure your Philips 568 mobile phone to best suit your lifestyle. Options Description Language Select the text entry language and Display language: • T9 language: Select to turn on/off T9 preferred, T9 language and T9 Chinese.
Voice control Display time Select if you want to display the clock. Toggle between On or Off. Time zone Useto select your time zone. Set time & date Edit your current time and date. You may use voice control to call up a phone feature or phone dialing. • Voice command: Record phone features for voice command. • Voice dialling: Record the contact’s name for voice dialing. Please refer to the following description of "Record voice command" Time Format Set to 12 hours or 24 hours.
L Record Start recording (for three times) Cancel recording. L Repeat Record again or cancel recording. > Yes or > No or R Back Display You may configure your phone with different display settings: Options Description Wallpaper Select to turn on/off the wallpaper display. Themes Select different Theme types: Simple, Elegant and Intense. Backlight level Select one level from Maximum, High, Medium and Low. Backlight duration Select backlight duration from 1 minute, 30 seconds and 15 seconds.
Icons & symbols In idle mode, several symbols can be displayed simultaneously on the main screen. If the network symbol isn’t displayed, the network is not currently available. You may be in a bad reception area, moving to a different location may help. Silent - Your phone will not ring when receiving a call. Vibra - Your phone will vibrate when receiving a call. GPRS attach - Your phone is connected to the GPRS network. SMS message - You have received a new message.
Precautions Radio Waves Your cellular mobile phone is a low power radio transmitter and receiver. When it is operating, it sends and receives radio waves. The radio waves carry your voice or data signal to a base station that is connected to the telephone network. The network controls the power at which the phone transmits. • Your phone transmits/receives radio waves in the GSM frequency (900 / 1800 / 1900 MHz). • The GSM network controls transmission power (0.01 to 2 watts).
Equipment and Telecommunications Terminal Equipment Directive 1999/5/EC. Always switch off your phone... Inadequately protected or sensitive electronic equipment may be affected by radio energy. This interference can lead to accidents. Before boarding an aircraft and/or when packing the phone in your luggage: the use of mobile phones in an aircraft may be dangerous for the operation of the aircraft, disrupt the mobile phones network and may be illegal.
Improved performance In order to improve the performance of your phone, reduce radio energy emission, reduce battery consumption and ensure safe operation adhere to the following guidelines: For the optimal and satisfactory operation of the phone you are recommended to use the phone in the normal operating position (when not using in hands-free mode or with a hands-free accessory). • Do not expose your phone to extreme temperatures. • Treat the phone with care.
Your mobile phone and your car • • • • • Studies have shown that speaking on thetelephone while driving lowers your concentration, which can be dangerous. Adhere to the following guidelines: Give your full attention to driving. Pull off the road and park before using the phone. Respect the local regulations in countries where you drive and use your GSM phone. If you want to use your phone in a vehicle, install the hands-free car kit which is designed for that purpose.
The battery should not be disposed of with general household waste. The labelled packaging material is recyclable. A financial contribution has been made to the associated national packaging recovery and recycling system. The plastic material is recyclable (also identifies the type of plastic).
Troubleshooting The phone does not switch on Remove/reinstall the battery. Then charge the phone until the battery icon stops scrolling. Unplug from charger and try to switch the mobile on. The display shows BLOCKED when you switch on Somebody tried to use your phone but didn’t know the PIN code nor the unblocking code (PUK). Contact your service provider. The display shows IMSI failure This problem is related to your subscription. Contact your operator.
the number of your SMS centre, or contact your operator for detailed information on this subject. You can’t receive and/or store JPEG pictures A picture may not be accepted by your mobile phone if it is too large, if its name is too long, or if it doesn’t have the correct file format. You have the feeling that you miss some calls Check your call divert options.
Philips Authentic Accessories Some accessories, such as a battery and a charger, are included as standard in the package of your mobile phone. Additional accessories may also be provided or sold separately. Package contents may therefore vary. To maximise the performance of your Philips mobile phone and not to void the warranty, always purchase Philips Authentic Accessories that are specially designed for use with your phone.
Trademark declaration JAVA is a trademark of Sun Microsystems, Inc. T9 ® is a trademark of Tegic Communications Inc. Tegic Euro. Pat. App. 0842463 In-Fusio and the games engine Exen are trademarks of In-Fusio France.
Limited warranty 1. 3. What Does This Limited Warranty Cover? Philips warrants to the original retail purchaser (“Consumer” or “You”) that this Philips cellular product and all accessories originally provided by Philips in the sales package (“Product”) are free from defects in materials, design and workmanship under normal use in accordance with the operating instructions and pursuant to the following terms and conditions.
g) Product returned without valid proof of purchase or which proof of purchase has been altered or is illegible. h) Normal wear and tear or Force Majeure.
6. Other Limitation: This Warranty is The Entire Agreement. EXCEPT FOR THE EXPRESS WARRANTIES SET FORTH ABOVE AND THOSE IMPLIED BY LAW AND WHICH CANNOT BE EXCLUDED OR MODIFIED BY AGREEMENT, PHILIPS PROVIDES NO OTHER WARRANTY WHETHER EXPRESS OR IMPLIED (WHETHER BY STATUTE, UNDER THE OPERATION OF LAW OR OTHERWISE) AND SPECIALLY DISCLAIMS ANY WARRANTY OF SATISFACTORY QUALITY MERCHANTABILITY OR FITNESS FOR A PARTICULAR PURPOSE.
this limited warranty and you should not rely on any such representation. This limited warranty does not affect the Consumer’s statutory rights under applicable national laws in force.
of the handset kept 1.5cm from the body. To maintain compliance with SAR INFORMATION FCC RF exposure requirements, use accessories that maintain a 1.5cm The SAR limit of USA (FCC) is 1.6 W/kg averaged over one gram of tissue. Device types Xenium 9@9m (FCC ID: T38CT9A9M) has also been tested against this SAR limit. The highest SAR value reported under this standard during product certification for use at the head is 0.331 W/kg and when properly worn on the body is 0.351 W/kg.
Cautions and can be broken. Avoid dropping, Any changes or modifications to your hitting, bending or sitting on it. phone not expressly approved in this document could void your warranty for this equipment and void your authority to operate this equipment. Only use approved batteries, antennas and chargers. The use of 1.1 FCC declaration of conformity for Section 15.
installation. This equipment generates, uses and can radiate radio frequency energy and, if not installed and used in accordance with the instructions, may cause harmful interference to radio communications. However, there — Reorient or relocate the receiving antenna. — Increase the separation between the equipment and receiver. — Connect the equipment into an outlet on a circuit different from that to which the receiver is connected. — Consult the dealer or an experienced radio/ TV technician for help.