42" 3D LCD-TV C42109DVB-3D User Guide
Contents SAFETY INFORMATION .............................................................................................................3 Headphone Warning ....................................................................................................................................................... 4 Where to install .............................................................................................................................................................. 4 LCD Screen.............
Multimedia Operation.............................................................................................................19 Photo ............................................................................................................................................................................19 Music ............................................................................................................................................................................20 Movie ............
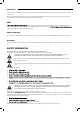
Introduction Thank you for purchasing this LCD TV which has been designed and manufactured to give you many years of trouble free service. You may already be familiar with using a similar product but please take time to read these instructions which have been written to ensure you get the very best from your purchase. HDMI Safety is important EN terface) is the next generation of digital interface.
This unit has been produced according to all current safety regulations. The following safety tips should safeguard users against careless use and the dangers connected with such use. tured and rigorously checked prior leaving the factory, as with all electrical appliances it is possible for problems to develop. If you notice smoke, an excessive build up of heat or any other unexpected phenomena, you should disconnect the plug from the mains power socket immediately.
3D Safety Information • • • • • If you watch the 3D imaging too closely or for a long period of time, it may harm your eyesight. Watching the TV or playing video games that incorporate 3D imaging with the 3D glasses for a long period of time can cause drowsiness, headaches or fatigue to you and/or your eyes. If you have a headache, or otherwise feel fatigued or drowsy, stop watching the TV and take a rest.
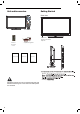
Unit and Accessories Getting Started Front view TV set Remote Control LCD Indicator Remote Control Window Keep clear Batteries for Remote Control 4 x polarized glasses SOURCE Quick Start Guide Quick Start Guide Warranty Card User Guide Warranty Card User Guide Quick Start Guide Source Qui ck St ar t Gui de . Standby Packaging materials are not toys. Please keep away from children. Plastic bags can cause suffocation when pulled over the head.
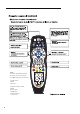
CHANNEL SETUP ATV DTV Media AV PC Component SCART HDMI1 HDMI2 HDMI3 Power switch Turn on or standby.
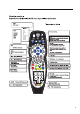
s * TV * * key Note: To select 3D mode press the P button 3 times and using the arrow keys select from; In DTV mode 3D Off 2D to 3D In Media or Hdmi mode 3D Off Side by Side Top/Bottom Frame Packing Line by Line 8 8
9 9
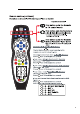
1. Remove the battery compartment cover at the rear of the remote control by pushing the retaining clip forward and pulling up. 2. Install the supplied batteries, ensuring the polarity matches what is shown in the battery compartment. 3. Replace the battery compartment cover. Aerial connection WARNING! ENSURE THE TV AND ALL ANCILLARY EQUIPMENT IS UNPLUGGED FROM THE MAINS BEFORE MAKING ANY CONNECTIONS! Connecting the TV Antenna Connect the TV antenna to the aerial socket with a 75 ohm co-axial plug.
11
CONNECTIONS Name Function Description USB Connect to USB device for multimedia HDMI 1, 2, 3 Connect to the HDMI socket of your DVD or Satellite Box SCART Connect to the Scart input / output of external devices PC-IN PC audio input VGA Connect to the PC VGA output to display PC graphics Headphone Connect Headphone YPbPr Connect to the YPbPr output on external devices Video Connect to the video output of external devices L/R audio in Audio signal input for AV (Shared with YPbPr) TV Connec
Connecting a DVD player Video recorder Connect a DVD player using either a SCART cable , the HDMI cable or YPbPr cable (only if your external equipment supports HDMI). Audio cable YPbPr cable Scart cable Use Scart adapter cable HDMI to HDMI Video camera AV cable (All illustrated cables are not supplied) SCART Connecting an audio system (All illustrated cables are not supplied) You can supply the TV sound to the stereo system (A) with the Scart socket. Use a special Scart cable SCART to RCA.
Common Interface Slot Auto installation setup USING YOUR COMMON INTERFACE SLOT Power On / Off the LCD TV The Common Interface (CI) slot is designed to accept the Conditional Access Module (CAM) and Smart Card in order to view the pay TV programmes and additional services. Contact your Pay Per View TV service provider to get more information about the modules and subscriptions. NOTE: Conditional Access Module and Smart Cards are sold separately.
Source Menu Menu Settings You can select the input source menu by pressing the Source button on the remote control or the SOURCE button on the LCD TV. 1. Turn the LCD TV on. 2. Press the Menu button on the Remote Control. 3. Use the and buttons to navigate through the menu. 4. Press the Exit button to exit the Menu. CHANNEL MENU Allows you to search channels and set up a variety of channel options. (Select DTV source for example) Press Source button on the remote control.
TIME MENU Allows you to setup a variety of time options. (Select DTV source for example) Menu Settings (continued) EN 1 CHANNEL MENU Description LOCK MENU Allows you to set up a variety of lock options. (Select DTV source for example) Auto Tuning Press the OK button to enter the menu, and select the Country and Tuning mode for the TV, then Press OK button to start the auto tuning.
PICTURE menu Colour System Menu Settings (continue d ) Programme Edit Press the OK button to enter the Programme Edit menu as below. Picture Mode: Choose from Standard, Dynamic, Personal and Mild. Note: Contrast, Brightness, Colour and sharpness are only available and can be adjusted in the Personal mode option in the Picture Mode Settings. Contrast: Controls the difference between the brightest and darkest regions of the picture. Brightness: Controls the overall brightness of the picture.
Sound Menu OSD Language: choose the menu language Audio Languages (can only be selected in DTV mode): Select the audio language. Subtitle Language (can only be selected in DTV mode) Select the subtitle language. Hearing Impaired Turn On/Off the hearing Impaired function. PVR File System: Setup the PVR file System Aspect Screen: Choose from Auto, 4:3, 16:9, Zoom1, Zoom2, Panorama. Sound Mode: Allows you to select Standard, Music, Movie, Sports or Personal.
Multimedia Operation MAIN MENU: PHOTO MUSIC MOVIE TEXT Press the source button to display the Input source menu and select Media, press the OK button to enter the USB menu as seen in picture above. les you want to Insert USB device and sel listen too or view from PHOTO, MUSIC, MOVIE and TEXT. Then Press OK to enter the menu and choose the folder le you wish to activate.
Music Step forward: Step quickly through the movie using this option Play the music Press press buttons to select the option on the menu and button to activate. Goto Time: Play the movie from the time you set Text View te les EN .mp3 Pause: Play/Pause the music FB/FF: Fast back and Fast forward Prev/Next: Play the previous or ne le .
Recording Operation Note: Delete any scheduled recordings out of this list with the RED button. PVR Settings Schedule List PVR File System: Press the MENU button and select the OPTION menu, choose PVR File System and press OK. Press the A button on the remote control to display the recorder schedule list Note: Delete any scheduled recordings out of this list with the RED button Timer Record When selecting a programme in the EPG for Timer record the Recorder menu will appear.
Recording EPG Recording Record and Time shift function buttons Display the programme guide by pressing the GUIDE button When you press the Rec button the navigation menu will display on screen. Note: Display and exit the navigation menu by pressing button. While you are recording you can press the the play button and watch what has already been recorded. 0000:21:40 Recording: Press Pause: Press pause live TV. Stop: Press process.
TV System PAL/BG/DK/ I Audio System BG/DK/I Screen size 42” (Diagonal) Resolution 1920 x 1080 Pixels (RGB) Aerial input 75 Ohm (unbalanced) Audio output power 2 x 8W Power requirements Power consumption 100-240V Max 138W Standby power consumption <0.
3D Specifications Remote contr Waste Electrical Recycling cations Type Infrared Control distance 5m Control angle 30 degrees (Horizontal) Batteries 2 x 1.5V, Size AA Dimensions 48 x 193 x 20mm Weight 120g (without batteries) Correct disposal of Product Wall Mounting 1. The stand must rst be removed. Place the TV face down. 2. Remove the four screws on the back of the TV to release the stand. 3. Remove and store the stand and screws. 4. Use four machine screws to mount the TV on the bracket.