
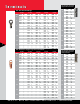
Specifications


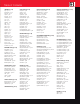


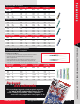

Order today, call toll-free 1-800-633-3655 or fax us at 1-775-322-7477
Terminals
Terminals
9 8 % F i l l R a t e a n d i n c R e a s e d P R o F i t a b i l i t y – G u a R a n t e e d
www.jttproducts.com sales@thebestconnection.com
JT&T Products
2
n
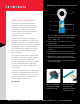
Translucent, adhesive-lined polyolefin tubing allows
visual inspection, prevents wire corrosion and
provides a waterproof seal.
n
Easy installation with pre-measured solder takes
the guesswork out of the soldering process.
n
A soldered electrical connection provides superior
current flow and tensile strength.
n
Color-coded tubing with wire gauge imprint provides
easy identification of the correct part for the job.
n
Pre-fluxed, low temperature solder delivers superior
current flow and tensile strength.
n
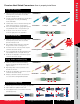
Translucent, adhesive-lined heat shrink tubing
allows for visual inspection and provides a seal
against corrosion.
n
High quality, crimp connectors provide a secure
mechanical connection.
n
Pre-fluxed, low temperature solder delivers superior
current flow and tensile strength.
n
Crimped, soldered and sealed connection meets
or exceeds the most stringent OEM standards.
n
Translucent, adhesive-lined polyolefin tubing allows
visual inspection, prevents wire corrosion and
provides a waterproof seal.
n
Conforms to automotive manufacturers’ specifications
for wiring repairs, necessary for maintaining
electrical warranties.
n
Seamless butt connectors & brazed seam rings and
spades prevent opening of connector barrel.
n
Color-coded tubing with wire gauge imprint provides
easy identification of the correct part for the job.
n
A selection of over 100 sizes of connectors
ensures the right part for every application.
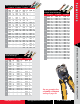
1 Insert Wires 3 Heat It 4 Seal It
Installation
Installation
Premium Heat Shrink Connectors: How to properly install them
Crimp and Seal
(
CS
)
Solder and Seal
(
SS
)
Crimp, Solder and Seal
(
CSS
)
How to Properly Crimp
2 Crimp It
1 Insert Wires 3 Solder It 4 Seal It2 Crimp It
5/16”
Crimp Solder Crimp
Solder
Crimp Crimp
1
Select the proper connector for wire gauge and application.
2
Strip insulation 5/16” (8mm) from wire end.
3
Insert stripped wire into connector barrel and crimp
(indicated by arrows).
1 Intermingle Wires 3 Seal It2 Solder It
No
Crimping
Installation