
User Manual

12~24VDC
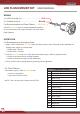
INSTALLATION - BRACKET MOUNT (sold-separately)
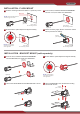
Ensure that the optical stripes are aligned vertically.
2
Secure the LIGHTHEAD onto the BRACKET with a screw.
3
From the front, install the MOUNTING GROMMET
onto the BRACKET, and insert the LIGHTHEAD.
1
Lighthead
Mounting
grommet
Secure the BRACKET onto the desired mounting
surface with screws.
4
Screw
(M3 x 8mm)
Mounting
surface
Screws
(#6 x 18mm)
Mounting
surface
INSTALLATION - FLUSH MOUNT
Select a mounting location and drill an 1” (25.4mm) cut-out.
1
Lighthead
Mounting
grommet
NOTE: Recommended surface
thickness @ 0.8~2.0mm
NOTE: Optical stripes
must align vertically to
meet regulation.
NOTE: Optical stripes
must align vertically to
meet regulation.
Ø25.4mm
Ensure that the optical stripes are aligned vertically.
3
lens
From the front, install the MOUNTING GROMMET
onto the cut-out, and insert the LIGHTHEAD.
2
Front side of
the mounting surface
Front side of
the mounting surface
Front side of
the mounting surface
Lighthead
Where necessary, apply silicone around the reverse
side to prevent from rotating.
4
Reverse side of
the mounting surface
Silicone
(user supplier)
SILICONE
SILICONE