
Instruction Manual


10
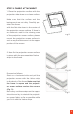
Fig 15.
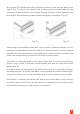
Fig 16.
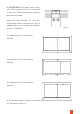
2. Measure the distance H and L (acc.
to g. 10) and transfer this onto the
wall (Fig. 15).
4. Hang the screen on the mounting
brackets according to Fig. 16.
The assembly is now complete.
3. Mount the mounting bracket (C) with the self-tapping screws (F) and the
plastic dowels (K) in a load-bearing surface. Please use suitable mounting ma-
terial for your surface.
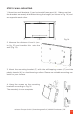
STEP 3: WALL MOUNTING
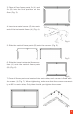
1. Mount two wall brackets (I) per horizontal frame part (A). Make sure that
the brackets are evenly distributed along the length (as shown in Fig. 14) and
are opposite each other.
Fig 14.
celexon Europe GmbH | Gutenbergstraße 2 | 48282 Emsdetten | DE