
Instruction manual


When satisfied with the collimation, tighten the small locking screws. Take note of the direction the light
appears to flare. For example, if it appears to flare toward the three o’clock position in the field of view, then
you must move whichever screw or combination of collimation screws necessary to move the star’s image
toward the direction of the flaring. In this example, you would want to move the image of the star in your
eyepiece, by adjusting the collimation screws, toward the three o’clock position in the field of view. It may
only be necessary to adjust a screw enough to move the star’s image from the center of the field of view to
about halfway, or less, toward the field’s edge (when using a high power ocular).
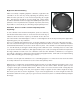
Collimation adjustments are best made while viewing the star’s position in the field of view and turning the
adjustment screws simultaneously. This way, you can see exactly which way the movement occurs. It may
be helpful to have two people working together: one viewing and instructing which screws to turn and by
how much, and the other performing the adjustments.
IMPORTANT: After making the first, or each adjustment, it is necessary to re-aim the telescope tube to re-center the
star again in the center of the field of view. The star image can then be judged for symmetry by going just inside and
outside of exact focus and noting the star’s pattern. Improvement should be seen if the proper adjustments are made.
Since three screws are present, it may be necessary to move at least two to achieve the necessary mirror movement.
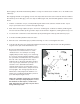
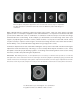
A collimated telescope should appear as a symmetrical
ring pattern similar to the diffraction disk seen here.
23
Figure 7-3
Figure 7-2
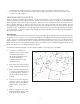
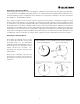
Even though the star pattern appears the same on both sides of focus, they are asymmetric.
The dark obstruction is skewed off to the left side of the diffraction pattern indicating poor
collimation.