
Specifications


INSTALLATION AND OPERATING INSTRUCTIONS
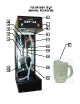
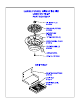
MODEL: TB-3P
MANUAL POUR-OVER BREWER
WARNING: MACHINE WARRANTY IS VOID IF CONNECTED TO ANY VOLTAGE OTHER THAN
120 VOLTS.
NOTE: A dedicated 120 Volt, 15-Ampere Grounded Outlet should be supplied for each unit installed. Check
local codes for compliance installation.
The TB-3P is a Manual Pour-over Brewer and therefore is NOT equipped with water inlet connection.
Items shipped with Brewer: ½ Gal. Pitcher, 4” legs, drip tray and Instruction Manual.
SETTING UP THE BREWER
1. Carefully remove the Tea Brewer from the carton.
2. Remove the 3-Gallon Tea Dispenser.
3. Place the 3 Gallon Tea Dispenser, with Brew Cover, onto the base of the Brewer with the hole in the
cover positioned under the brew funnel.
PRIMING INSTRUCTIONS
NOTE: The Brewer must be primed when first installed to remove all air from the system and to obtain the
correct volume of water during regular operation.
AIR LOCK: Occasionally the machine becomes air locked during this priming cycle. A
few taps to the side of the machine will resolve this air lock problem.
TO PRIME:
1. Plug into dedicated 120 Volt 15 Amp Grounded Outlet.
2. Turn the RED Power Switch to “ON”. Place the brew funnel and 3 Gallon Tea Dispenser in position,
pour one ½ Gallon Pitcher (supplied) of cold water through the screened opening in the top cover AT 2
MINUTE INTERVALS. Allow 30 seconds for the GREEN Ready Light to come on. A lit Ready
Light indicates that the system is energized and that the brew cycle is just about to begin. If ready light
does not come on within 30 seconds, the machine is air locked (see AIR LOCK above).
3. When the ready light goes out and the funnel stops dripping, (about 9 to 10 minutes) the priming cycle is
finished.
4. The machine is now ready to brew a batch of Fresh Brewed Iced Tea.
5. NOTE: The above outlined procedure is only required during the initial set up of the brewer or when the
brewer has been serviced and the generator tank has been drained.