
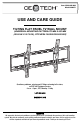
Instructions / Assembly
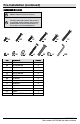

9 HOMEDEPOT.COM
Please contact 1-877-527-0313 for further assistance.
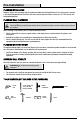
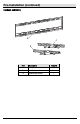
Installation (continued)
5
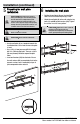
Preparing for wall plate
installation
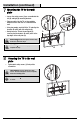
6
Installing the wall plate
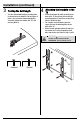
CAUTION: Avoid drilling near electrical
wiring and water pipes. The mounting system
must be attached to a weight bearing wall.
Failure to observe all safety precautions can
result in serious physical injury and/or property
damage. Consult a professional installer or call
customer service if you have any questions.
CAUTION: Do not drill into mortar between
bricks or into loose concrete.
CAUTION: Never drill into hollow brick.
□ Use the wall plate (A) as a template to mark the
installation holes. Use a level to ensure the plate
is level.
□ Use a 1/4 in. (6 mm) masonry drill bit to slowly
drill 3 in. (76 mm) pilot holes. Then use a 3/8 in.
(10 mm) masonry drill bit to expand the pilot
holes.
□ Insert wall anchors (KK) into the holes. Ensure
the wall anchors (KK) are completely flush to the
concrete surface, even if covered by a layer of
joint compound or other material.
□ Position the wall plate (A) over the installation
holes. Ensure that the wall plate (A) is level.
□ Attach the wall plate (A) to the wall using the lag
bolts (JJ) and M6 lag bolt washers (HH). Tighten
the screws in a criss-cross pattern.
CAUTION: Tighten the screws so that the
wall plate is firmly attached. Do not
overtighten. Over-tightening can damage the
screws, greatly reducing the holding power.
KK
KK
A
A
JJ
HH
1
4
5
6
2
3