
Technical data

Installation
1. Screw the tail pipes (G) into the base of the tap (A), note the hot tail pipe should typically be connected to the left hand side of the tap when viewed
from the front.
2. Pass the upper seal (B) over the threaded section of the tap (A) and up to the recess in the base of the tap (A).
3. Place the mixertap (A) onto the sink or worktop and pass the tail pipes (G) and the threaded fixing section of the tap (A) through the taphole. With
the tap (A) in place check that the tails (G) meet the hot and cold water feeds. If further adjustment to the plumbing is required do this now. Note: do
not twist, stretch or kink the tail pipes (G)
4. Pass the lower seal (C) over the threaded section of the tap (A) followed by the metal washer (D).
5. Thread the fixing nut (E) over the threaded section of the tap (A).
6. Adjust the tap (A) straight and square to the worktop/sink and tighten fixing nut (E) securely to fix the tap (A) in place.
7. If fixing to a worktop secure fixing nut (E) in place using screws (F). Note: If fitting this tap to a sink omit this step.
8. Attach the spray head (M) to the hose (K) ensuring seal (L) is used.
9. Connect the hot and cold water tail pipes (G) to the water supply pipes using nuts (J) and olives (I)
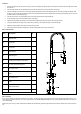
Parts and Contents
Key Description Qty
A Mixertap body 1
B Upper seal 1
C Lower seal 1
D Metal washer 1
E Metal fixing nut 1
F
Fixing screws (only required for
mounting to worktops and not sinks)
2
G Hot and cold flexible tail pipes 2
H Non-return valve 2
I Olive 2
J Compression nut 2
K Hose 1
L Spray head washer 1
M Spray head 1
After installation:
Once you have visually checked the new fittings and connections, ensure that all taps are closed except the new mixer tap, which should be left open. Turn
on the water supply at the mains stop cock. As the system starts to refill, check carefully for leaks. Once you are fully satisfied that there are no leaks, turn
on the water heating.
Clean the tap to remove any marks created during installation as instructed then replace the bag that has been provided to protect the tap until it is ready for
use.