
Manual


E-Map Application
473
9
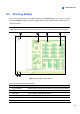
9.3 Starting E-Map
After creating an E-Map file, go to the Main System. Click the ViewLog button (No.13, Figure 1-2) and
then select E-Map to display the following E-Map Viewer window. Double-click any E-Map file of the
local host to open it.
Note: If you have created the E-Map files for remote hosts
, these files will also be displayed in the
E-Map Viewer window but won’t function here. They only work on WebCam that is discussed later.
3 4
5
6
2
1
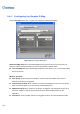
Figure 9-5 The E-Map Viewer Window
The controls in the E-Map Viewer window:
No. Name Description
1 Popup Settings Selects desired cameras and I/O devices for the pop-up map function.
2 Toggle Popup Toggles between popup and non-popup function.
3 Tree View The tree view of E-Map files and folders.
4 Blinking Icon The blinking icon represents a triggered camera or an I/O device.
5 Output Icon Manually forces an output device.
6 Camera/Dome Icon Views the live video associated with that camera/dome.