
Instruction Manual


148
Timeline Search
In addition to Date Tree, the system provides you another graphical search method called “Timeline” to
locate the desired video events within a set period of time.
1. Select the desired view mode for playback by clicking the View Mode button (No. 6, Figure 4-1).
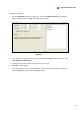
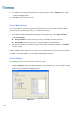
2. Click the Advanced button (No. 8, Figure 4-1), and select Timeline Search. This window
appears.
Figure 4-7
3. If you want to search the video events recorded during the Daylight Saving Time period, select
Search the DST rollback event.
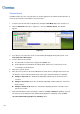
4. Select a date from the calendar.
z The date with recorded events is displayed in GREEN color.
z On the right panel, the BLUE blocks indicate which camera has recorded events on the
selected date and at which hour.
5. Click on the desired camera.
6. Move the mouse pointer on the desired BLUE block of that camera, and right-click it to have the
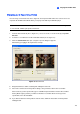
sub Timelines of hour mode and minute mode. Three types of timeline2 modes are available:
Change to day mode: The default mode displaying at which hour the events have been
recorded.
Change to hour mode: Opens the sub Timeline displaying at which minute the events have
been recorded.
Change to minute mode: Opens the sub Timeline displaying at which second the events
have been recorded.
7. Click on the BLUE block of the desired time, and then click Play or Rewind for playback. If you do
not want to close the Timeline Search window during playback or rewinding, select the Don’t
close this window during playback or rewinding option.