
Instruction Manual


136
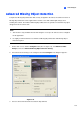
4. Click the
button to outline the regions on the objects you want to detect. To cancel the
previously drawn area, click the
button.
5. Select Sensitivity. The higher the value, the more sensitive the system is for changes in the
camera view.
6. Specify Tolerance Time of Alarm in seconds that allows any object missing before an alarm
condition is activated.
7. Every time when the system detects changes in the background image, you will be prompted for
alert. If you want to close the prompt, select Hide Reference Image Setup Dialog.
8. In the Options section, configure these settings:
Embed Alarm Region into Recorded Video: This option will contain the flashing alert boxes
in the recorded files so that you can easily spot suspicious events during playback. Note that if
you are used to searching suspicious events with Object Search, do not enable this option.
These flashing boxes can cause false alarms.
Skip Instant Light Change: Select this option if your scene has the condition of sudden light
changes. See the Note in Crowd Detection.
Invoke Alarm: Enables the computer alarm when an assemblage is detected. Click the […]
button next to the option to assign a .wav sound file.
Output Module: Activates the output device when an assemblage is detected. Click the […]
button next to the option to assign an installed output module and a pin number.
Never Recycle: Enables the system not to recycle the event files of missing object detection.
9. You
can click Test to test your settings. If the missing object cannot be detected, increase
Sensitivity value to increase system sensitivity to changes in the camera view.
10. Click OK to apply the settings, and start monitoring to run the application.
When any object, which you have outlined the regions for, disappears from the camera view for the
specified time, its location will be highlighted in live video, the selected alarm or output will be activated,
and the event will be recorded as Advanced Missing Object in System Log for later retrieval.