
Manual


12
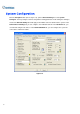
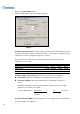
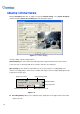
2. Click the Add Storage Group icon to add a storage group. The first Storage
Group is created by default.
3. Check the Cameras to be contained in the storage group.
4. Check the Keep Days option and specify the number of days to keep the video files in
storage.
5. Click the Add New Path icon to specify a storage location.
6. Check the Enlarge Recycle Threshold option and specify the size if you like to enlarge
the default recycle size.
7. Click OK.
Recycle: When this option is selected, it will cause the oldest files to be deleted when the system
requires storage space for new surveillance videos. If it is not selected, the system will stop
recording when disk space is full.
Keep Days: Set to keep the files in storage for a set number of days. Users may specify to recycle
at 1 to 999 days. If the designated storage space is not big enough to keep all video files for the
defined days, the Recycle setting then overrides the Keep Days setting.
Note:
1. The video capture cards and GV-NVR have different default recycle sizes. When the storage
space meets the default recycle size, the system will overwrite the oldest files. The default recycle
size:
z GV-250 / 600 / 650 / 800 is 800 MB.
z GV-1120 / 1240 / 1480 is 1.2 GB.
z GV-2004 / 2008 is 2 GB.
z GV-NVR is 2 GB.
Every time the 400 MB of old files will be deleted upon reaching the default limit.
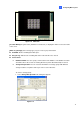
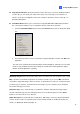
2. When one partition fell short than the minimum storage space, video files will automatically be
saved to next available hard disk; when total available storage space is lower than minimum, the
system will stop recording and show a Disk Space Low! message.
Figure 1-6
To solve the space shortage problem, you may add more hard disk space to the system, or to
delete/back up your video files for more storage space. To correctly delete or back up video files,
see Chapter 5 for more details.