
User's Manual

14
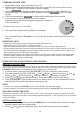
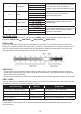
FIRMWARE UPDATE STEP
1. Download the latest version rmware to your PC.
2. Set the Console into AP (access point) mode then connect the PC to the console (ref to
"SETUP WI-FI CONNECTION" section in previous page).
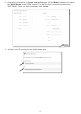
3. Click the
Browse
in rmware update section and browse the location of the le you
download in step 1. To update the WI-FI rmware, click the
Browse
in WI-FI rmware
section.
4. Click the corresponding
Upload
to start transfer the rmware le to console.
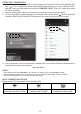
5. In the meantime, the console will execute the update
automatically and will show the update progress on display (i.e.
100 is completion).
The update time is around 5 ~ 10 minutes
6. The console will restart once the update is completed.
7. The console will stay in AP mode for you to check the rmware version and all the current
setting.
IMPORTANT NOTE:
- Please keep connecting the power during the rmware update process.
- Please make sure your PC's WI-FI connection is stable.
- When the update process start, do not operate the PC and console until the update nished.
- During rmware update the console will stop upload data to the cloud server. It will reconnect to your WI-FI
router and upload the data again once the rmware update succeed. If the console cannot connect to your
router, please enter the SETUP page to setup again.
- After the rmware update, If the setup informations are missing, please input the setup information again.
- Firmware update process have potential risk, which cannot guarantee 100% success. If the update fail,
please redo the above step to update again.
OTHER SETTING & FUNCTIONS OF THE CONSOLE
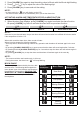
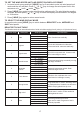
MANUAL CLOCK SETTING
This console is designed to obtain the UTC time by synchronize with the assigned Internet time server. If you
want to use it o line, you can set the time and date manually. During the rst time startup, press and hold the
[ SENSOR / WI-FI ] key for 6 seconds and let the console back to normal mode.
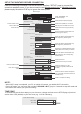
1. In normal mode, press and hold [ CLOCK SET ] key for 2 seconds to enter setting.
2. The setting sequence: DST AUTO/OFF
Hour Minute 12/24 hour format Year
Month
Day M-D/D-M format Time sync ON/OFF weekday Language.
3. Press [
] or [ ] key to change the value. Press and hold the key for quick-adjust.
4. Press [ CLOCK SET ] key to save and exit the setting mode, or it will automatically exit the
setting mode 60 seconds later without pressing any key.
NOTE:
- In normal mode, press [ CLOCK SET ] key to switch between year and date display.
- During the setting, you can back to normal model by press and hold [ CLOCK SET ] key for 2 seconds.
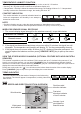
DAYLIGHT SAVING TIME (DST)
DST function is default "AUTO" (for EU or US version). If the current date on display is with in the summer
daylight saving period, the time will be automatically adjusted forward by +1 hour, and DST icon will be shown
on the LCD display.
SETTING ALARM TIME
1. In normal time mode, press and hold [ ALARM ] key for 2 seconds until the alarm hour digit
ashes to enter alarm time setting mode.
2. Press [
] or [ ] key to change the value. Press and hold the key for quick-adjust.