
Installation Sheet


SofStop Twin: Go to page 4 (overleaf)
3
PAGE
8 Removing the door(s) (for painting, repairs etc).
Fit the club end of the adjusting wrench over the
hexagonal nut at the bottom of the hanger pin.
Use the extended part of the wrench to press down the
plunger pin that protrudes up from the mounting plate.
Once this plunger is fully depressed slide the wrench
sideways towards the plunger pin.
The whole carriage (including the shaft) will now
disengage from the mounting plate.
It is not always easy to slide the wrench sideways.
You may need to relieve the door’s weight by putting a
wedge between door and floor.
Bi-Parting doors: Remove the black plastic stop that is
tightly fitted into the mounting plate by tapping it out in
the direction shown using a hammer and drift.
9 Removing the SofStop mechanism
If you need to remove or service the cassette, begin by
removing the door leaf (instruction 8).
Loosen the M5 pan head machine screw and slide the
front carriage towards the closing jamb until it can be
removed via the notch. Repeat for the cassette and rear
carriage.
Track stop
Carriage
removal
notch
Track
Another quality product from:
Cavity Sliders USA Inc.
548 Finney Ct, Gardena, CA 90248
Phone: (888) 466 0030
Fax: (310) 769 5824
info@cavitysliders.com
www.cavitysliders.com
© All copyright and other property in this document is reserved by Cavity Sliders USA Inc.
Details and specifications are subject to change without notice. Whilst all care is taken to
ensure the accuracy of all information, no responsibility will be accepted for any errors or
omissions.
CS SOFSTOP™ (O.D. 2012). 09.2017 - ZNI125 / 60721/US
Black plastic stop
(Bi-Parting
units)
Tap this way
to remove
To lower
door
To raise
door
Club end
of wrench
Adjusting
wrench
Mounting
plate
Plunger
pin
Activator
setting
block
Door
CAVITY POCKET
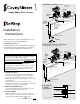
3. Insert the casette into the notched end
of the track.
2. Insert the Rear Carriage into the
notched end of the track. Note Rear
Carriage has NO TOWBAR.
3. Insert the casette into the notched end
of the track.
IMPORTANT: the Sofstop Cassette has been supplied set by the manufacturer, it is important that it is not tampered with prior to installation.
Activator
Slide
activator to
center of door
opening
Grub
screws
Opening
C
L
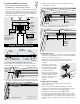
With the door open, loosen the all four Activator grub screws until the activator slides freely in the track.
Roughly position the Activator in the centre of the door opening and tighten
one
of the four grub screws to fix it in position.
Marked line
Activator
Positioning
Template
Gently close the door, it should stop before hitting the closing jamb. Open the door, the Sofstop Mechanism is now activated.
Open the door and loosen the grub screw to allow the Activator to slide freely in the track.
Open the door. Without moving the activator tighten
one
of the four grub screws.
Place the 'Activator Positioning Template' at the end closest to the cavity pocket and mark a line.
Remove the Template and loosen the grub screws. Slide the Activator up to the marked line.
Without moving the Activator tighten all four grub screws. The Activator is now positioned.
SETTING THE ACTIVATOR
Pocket
Pocket
b) Slowly close the door until the pickup mechanism goes
past the activator. You will hear a click. The cassette is now
charged. Open the door again and loosen the grub screw.
c) Position the activator setting block inside the closing jamb
and gently close the door onto it. The activator will slide
along the track into the correct position.
d) Open the door and remove the activator setting block.
Without moving the activator, tighten all four grub screws.
The activator is now positioned.
Note: Some doors may still bump on the closing jamb when
closing. If this is a concern, a 3M clear dome stop (or similar)
can be used.
a) Open the door and insert the activator, moving it into the
approximate center of the door opening. Tighten one grub
screw.
6 Set the activator position
6
If you raise the door to the maximum height position, the
threaded bolt may contact fixing screw heads. If required,
remove hanger bolt from wheel and remove 2-3mm (1/8”) of
thread.
7 Bi-Parting (Double) doors.
Slide the track stop into the track via the carriage
removal notch and loosely tighten so that the track
stop is still able to slide.
Use the door to push the track stop to where you
want the door to stop. Slide the door away and
tighten the track stops using a hex key.
Single Action Soft Close