
Installation Sheet

5 Hanging the doors (drawing V & W).
Insert the carriages into the track through the
notched end, taking care not to damage the wheels
on the sharp edge of the track.
Position the carriages in the pocket opening
approximately where the mounting plates on the
door will be located when the door is in the closed
position.
Position the door underneath the carriages.
Raise the door up so that the round head of the
wheel hanger shaft lines up with the keyhole shaped
hole in the mounting plate.
Depress the plunger using the wheel hanger shaft
head and slide sideways until it snaps into locked
position. Repeat for the other carriage.
Adjust door for plumb and desired under door
clearance (instruction 7).
6 For Double (Bi-Parting) doors (drawing W).
Slide the track stop into the track (via the carriage
removal notch) and loosely tighten so that the track
stop is still able to slide.
Use the door to push the track stop to where you
want the door to stop. Slide the door away and
tighten the track stops using an Allen key.
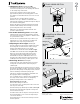
7 Adjusting the door height (drawing Y).
Use the small end of the wrench supplied to rotate
the hexagonal nut at the bottom of the carriage
hanger shaft. Adjust the doors for plumb.
To raise door: Rotate wrench from left to right.
To lower door: Rotate wrench from right to left.
Note: The top of the hanger shaft screws into a
self-locking nut. If the hexagonal nut is turned
downwards too far, the shaft will become loose
from the self-locking nut. If the turning resistance
suddenly feels much easier, you have gone too far.
8 Removing the door (drawing Y).
Fit the club end of the adjusting wrench over the
hexagonal nut at the bottom of the hanger pin
(drawing Y).
Use the extended part of the wrench to press down
the plunger pin that protrudes up from the mounting
plate. Once this plunger is fully depressed, slide the
wrench sideways towards the plunger pin.
The whole carriage (including the shaft) will now
disengage from the mounting plate.
It is not always easy to slide the wrench sideways.
You may need to relieve the door’s weight by
putting a wedge between door and floor.
Bi-Parting Units (drawing Z):
Remove the carriages as above.
To remove the door, you may first need to move the
red stop out of the way:
Push the red stop up until the pin is visible (drawing Z).
Push the pin all the way through the red stop and
remove it from the stop.
You will now be able to drop the red stop down into
the mounting plate so it is out of the way and you
can remove the door.
Use an Allen key to remove the track stop from the
track if required.
Another quality product from:
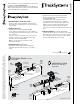
Drawings are not to scale.
TRACK CROSS SECTION
See point 3.
X
ADJUSTING & REMOVING
CARRIAGES
See point 7.
REMOVING DOOR (Bi-Parting)
See point 7.
Y
2
PAGE
60
170
75
54
Plunger pin
Mounting
plate
Mounting
plate
Red stop
Club end of
wrench
To lower door
To raise
door
Pin
Track
stop
Lintel
Door
© Cavity Sliders USA Inc