
Installation Sheet

60
170
75
54
60mm
(2-3/8”)
170
mm
(6-3/4”)
75
mm
(3”)
54
mm
(2-1/8”)
1 Contamination of the top track.
Ensure no dirt, grit or aluminum swarf gets into
the track. This could impair the smooth running of
the carriages.
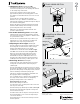
2 Prepare the door.
Prepare door as shown (drawing V or W).
Screw both mounting plates to the door with the
mounting plates placed exactly in the center of the
door thickness.
If you are using a CS T-Guide, cut a groove in the
bottom of the door leaf to the dimensions and
tolerances shown (drawing V).
Make it central of the door thickness and
absolutely straight.
3 Install the track (drawing X).
Important: The track must be installed level
otherwise the door will roll open or closed by
itself.
3 The track must be fitted level and straight.
Fix through all the pre-drilled fixing holes
provided (drawing X).
For timber lintels: Use 8 gauge screws
penetrating the lintel by at least 1” (25mm).
For light steel lintels (under 2mm (3/32”) wall
thickness): Use 8 gauge self-tapping screws
which penetrate the lintel by at least 5mm.
For heavy steel lintels: Use M5 machine bolts and
nuts.
4 Fix the T-Guide (if required, drawing V).
Fix the T-Guide to the floor so that it is not visible
when the door is fully open or closed. For pocket
door installations, the front edge of the T-Guide
should sit flush with the final casings.
© All copyright and other property in this document is reserved by Cavity Sliders USA Inc. Details and
specifications are subject to change without notice. Whilst all care is taken to ensure the accuracy of all
information, no responsibility will be accepted for any errors or omissions. Patent Pending. 04.2018- 61158
1
PAGE
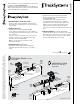
These instructions cover the preparation of doors and
installation of CS HeavyDuty Track.
Read through the notes carefully before beginning as
different mounting plate positions and setups may be
required for different configurations.
Go to page 2 (overleaf)
PREPARING DOORS - Single
See point 2.
PREPARING DOORS
Mount Plate with Stop
See point 2.
Front
edge
of
door
M10
carriage
M10
carriage
Front
edge
of
door
T-Guide
Rear
edge
of
door
Rear
edge
of
door
Fit screws
as shown
20-21mm
(13/16”)
5-5.5mm (1/4”)
ø25
(1”)
60
170
75
54
60
170
75
54
Fit screws
as shown
Mounting
plate
Plunger
pin
ø33mm (1-5/16”)
x 14mm (9/16”) deep
ø33mm
(1-5/16”)
x 14mm (9/16”)
deep
155mm (6 -1/ 8”)
to center of
boss hole
155mm
(6-1/ 8”)
to center
of boss
hole
155mm
(6-1/ 8”)
to center
of boss
hole
M10
mounting
plate with
stop
M10
track
stop
© Cavity Sliders USA Inc