
Instruction manual


CADA-U3A2
4
2
CHAPTERSETTING YOUR RAID MODE
RAID SWITCH SETUP (MAC Users or PC Users)
Most users will select their RAID-mode during the initial setup only. After that, they will usually forget about the other RAID
functions; which is probably for the best. RAID is a very powerful tool but can also easily erase all of your data! So, backup
your data to a separate location before you attempt any mode!
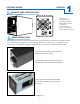
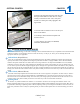
Turn the CADA enclosure off, if it is not already.
Turn your CADA enclosure backwards, and rotate it so that it matches the layout shown in your Quick Start Guide. This
will ensure that you use the correct switch settings.
Select your RAID mode using the switch settings below; depending on the OS you are using.
Verify that you are using the correct switch settings and hold the ‘Reset’ button for 15 seconds to complete the mode-
change.
Power your enclosure on and make sure it is securely connected to your PC.
Use the Disk Management Utility of your OS to initialize and format the new volume(s).*
*If you skip this step, your computer won’t ‘see’ your new array!
Initializing Your New Array
Once you have created your new array, you will need to ‘Initialize’ it before it will be accessible to your OS. This involves
partitioning and formatting your new RAID volume. This can be done using the Disk Management Utility of your OS.
Windows Vista/7
Mac OS X 10.4+
Windows XP*
*Due to operating system limitations, Windows XP can only access up to 2TB, even if the actual total capacity is greater. These switch congurations will
allow the computer to access up to 2TB on drives or combinations of drives with a usable capacity greater than 2TB. DO NOT insert hard drives if the
existing data totals more than 2TB as Windows XP might overwrite or delete it.
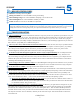
RAID 0 RAID 1 SPANNING
RAID 0 RAID 1 SPANNING
1
2
3
DIP ON
1
2
3
DIP ON
1
2
3
DIP ON
1
2
3
DIP ON
1
2
3
DIP ON
1
2
3
DIP ON
1.
2.
3.
4.
5.
6.