
Instruction manual
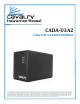


CADA-U3A2
2
1.
2.
POW
E
R
H
D
D
I
HDD
II
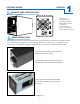
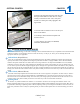
1. Power LED
2. Hard Drive LEDs
3. RAID Update Button
4. RAID Mode Switches
5. eSATA Port
6. USB 3.0/2.0 Port
7. Power Port and Switch
8. Replaceable External Fan
3.
4.
5.
6.
8.
7.
PRODUCT PART IDENTIFICATION
1
CHAPTERGETTING STARTED
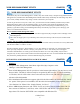
DRIVE INSTALLATION
This CADA unit will also be sold as an enclosure only model. This allows customers to use whichever brand
of 3.5” internal drive they prefer or are able to get a good discount on. The CADA is compatible with any
SATA II drives on the market, although you should always use two drives of identical make and model.
1. First, unscrew all-four screws from both
sides of the enclosure sleeve.
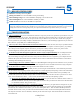
2. Next, slide the sleeve towards the rear of
the unit until it clears the chassis completely.
3. Now, unscrew all four front faceplate
screws. This will allow you to access the
drive-bays.