
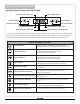
Specifications


Pg 11
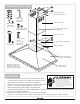
Installation (Continued)
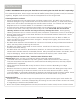
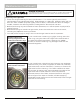
Figure 3A
Secure upper
support frame
Figure 3B
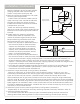
Figure 4
Mark the locations of the keyhole shaped
hanging bracket holes onto the wall as
shown in Figure 3A and Figure 3B.
Mark the mounting locations for the upper
chimney mounting bracket:
Inspect how this bracket installs into the
upper chimney cover, use that as reference
to where you want your upper chimney
installed and where the bracket should be
installed onto your wall.
Place the mounting bracket squarely
above the range hood, level it and mark the
locations of the mounting bracket holes on
the wall.
Predrill holes for mounting hardware:
Safely place aside all equipment and
review all marked regions and drill holes.
Review fastening hardware to be used.
Recommended for your type of wall:
• Sheet rock, drywall or wood walls where
the structural studs or solid structural
support are accessible: screw directly
into the structural studs or structural
support, with hardware that meets are
exceeds the factory hardware, with at
least 1” of thread engagement.
• Sheet rock, drywall or wood walls where
3.
4.
the structural studs or solid structural support are not accessible: Affixing the range hood
to into structural studs is highly recommended. If stud blockings are not available, it is
recommended to build a support structure behind the sheet rock for the best weight
support. If wall anchors are used, ensure their hanging capacity exceeds the weight of the
range hood, hardware, and estimated usage load.
• Concrete wall: Use designated concrete screws and/or anchors (not provided) that meet
or exceed the factory hardware specifications. Ensure proper load ratings. Follow
instructions of concrete screw manufacture.
Install the range hood body (if using factory hardware):
Fasten (2) two Type “A” anchors flush into the wall as shown in Figure 4, over your
previously marked locations for mounting the range hood body. Loosely fasten (2) two
Type “B” screws into the anchors – DO NOT fasten screws all the way down; leave
approximately 3/32” of gap from the wall to the screw head. Hang the range hood body
onto the Type “B” screws. Ensure the range hood is level and then fasten the screws completely.
Note: for wall mounted range hoods (not island mounted), the rear panel of the range hood
body (against the installation wall) is plain sheet metal and can be drilled and screwed into
the wall for additional stabilization. DO NOT drill into or screw through any wires, any wire
harnesses, or any critical fixtures.
Install the upper chimney mounting bracket (if using factory hardware):
Repeat step “6” for the upper chimney mounting bracket previously marked in step “3”.
Install the flexible duct tube:
First install the flexible duct tube onto your household ducting and then extend the
ducting downward, allowing about 6 inches of extra ducting; cut off excess ducting.
5.
6.
7.