
Installation Guide


STEP 1
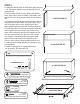
Glide Support Assembly
5/8” #7
1 1/4” #8
5/8” #7
5/8” #7
The glides look almost alike;
however, they are stamped
CR for cabinet right and CL
for cabinet left.
Left Side
Front
Right Side
Front
The “L” brackets are attached to the Glide Support using the large slot in the “L” bracket.
The Hole will be used to attach the table top.
Glide should be about flush with
the edge of the glide support.
Glide should be flush with back of glide support
Top of “L” Bracket should be even with the top of the glide support
5/8” #7
5/8” #7
NOTE: GLIDE HOLES SOMETIMES CHANGE, JUST
MAKE SURE THE CABINET GLIDES ARE FLUSH WITH
THE BACK OF THE GLIDE SUPPORTS & PILOT HOLES
WILL LINE UP - ONLY 2 HOLES ARE USED!
Decide at this point if you want the handle/towel bar on the right or the left side of the cabinet as
side panels are interchangeable. At this point the metal glides will determine left side/right side once
installed.