
120 Self-Flushing Self Washing Cat Litter Box - Manual Set Up

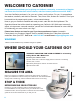
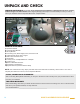
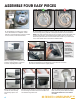
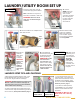
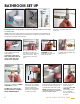

Table Of Contents

ASSEMBLE FOUR EASY PIECES
1. Unpack Base, Processing Unit, Hopper
Cover, GenieHand, the T-Adapters, and all
Manuals. The install location must have a water
source, a drain, and an electrical outlet.
2. Flip the Base to access the 10’ Drain Hose. Be careful with the GenieArm
when removing packing material. Leave Spare Parts Kit secured under Base.
Note: Coil Hose under base as shown. Do not tightly coil the hose as that could
prevent proper draining. Thread Drain Hose through groove cut into back of
Base. Bring the Drain Hose end to the waste drain or toilet. If you have excess
hose, make another loose coil under the CatGenie Base.
3. To run properly, your CatGenie must
be level in its nal location. Use shims
to level it, especially side to side.
a. Pull the Black Clip and GenieArm out of the slot.
b. Attach the GenieHand to the Black Clip. A click means it’s connected.
c. Push Arm and Hand back to upright position.
5. Line up Processing Unit
over its slot, then carefully
and securely slip the Unit
into it.
CAUTION:
The GenieHand
is locked in
place by the
Processing
Unit. Do NOT
force the Hand
into position.
Remove
Processing
Unit to move it.
6. Fit the Hopper Cover into grooves on right side of
the Processing Unit. Slide it down to t into Brim slot.
The CatGenie logo faces front.
7. Fit the Water Hose and Electric Cord in
back of Unit into grooves behind the Base.
Hand-tighten Water Hose nut. Do NOT
use tools.
Coil Drain Hose loosely
Do not tightly coil
c
GO TO PAGE 5 for LAUNDRY ROOM SET UP
GO TO PAGE 6 for BATHROOM SETUP
4.
a
b
4