
User Manual

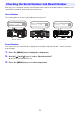

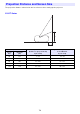
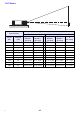
Table Of Contents
- Contents
- Safety Precautions
- Operating Precautions
- Getting Ready
- Unpacking
- Operation Flow to Projection
- General Guide
- Key and Indicator Panel
- Back Terminals
- Placing the Projector on a Desk or on the Floor
- Connecting with Another Device
- Connecting a Computer
- Connecting to a Video Device
- Outputting Audio from the Projector to Another Device
- Connecting a Microphone (XJ-UT Series, XJ-F21XN, XJ-F211WN, XJ-S400UN, XJ-S400WN)
- Connecting to a Network with a LAN Cable (Network Models Only)
- Connecting a Wireless Adapter (Network Models Only)
- LOGO Terminal (Firmware Updates, User Logo Transfers)
- Connecting a Scientific Calculator (Network Models Only)
- SERIAL Terminal (Projector Control Using Commands)
- USB Power
- Cover Included with the YW-41 Wireless Adapter
- Attaching and Removing the Cable Cover (XJ-UT Series)
- Remote Controller
- Operating the Projector
- Turning the Projector On or Off
- Selecting an Input Source (INPUT)
- Using Auto Projection Off
- Basic Image and Audio Operations During Projection
- Flipping the Projected Image Horizontally (Mirror Mode)
- Light Control
- Digital Screen Shift
- Projecting a Template
- Test Pattern Projection
- Control Panel Lock
- Configuring Remote Control ID and Projector ID Settings
- Using the Countdown Timer (TIMER)
- Using the Presentation Timer (TIMER)
- Using the Setup Menu (MENU)
- Using a Password
- Cleaning the Projector
- Troubleshooting
- Appendix
- Supplying USB Power to Another Device
- Mounting the Projector on a Wall (XJ-UT Series)
- Hanging the Projector from a Ceiling
- Using the MONITOR OUT Terminal (XJ-UT Series, XJ-S400UN, XJ-S400WN)
- Projection Distance and Screen Size
- Aspect Ratio Setting and Projection Image
- Supported Signals
- Projector RS-232C Control
- Specifications

77
You can use special wall mounting hardware to mount the projector on a wall. In this configuration, the
projector should be mounted with the top of the projector downwards.
For full details, contact the retailer where you purchased the projector.
Important!
When mounting the projector on a wall, make sure that it is at least one meter away from fire
detectors, fire alarms, and other fire protection devices. Locating the projector too close to a
fire protection device creates the risk of mis-operation of the device due to warm air
exhausted from the projector. Also, avoid locating the projector close to fluorescent lights or
other strong light sources. Bright light can shorten the operating range of the remote controller
or even make remote control impossible. When selecting a location for the projector, be sure
to test for proper operation of the remote controller.
The vertical and horizontal orientation of the projected image is reversed from normal when
the projector is positioned upside down for mounting on a wall. You need to change the setup
of the projector in order to correct for this. For details, see “Screen Settings 3 Ceiling Mount”
(page 62) under “Setup Menu Settings”.
The projector can be hung from a ceiling. When hanging a projector from the ceiling, you can orient it
upside down or with the projection lens facing straight downwards.
For full details, contact the retailer where you purchased the projector.
Important!
When hanging the projector from a ceiling, make sure that it is at least one meter away from
fire detectors, fire alarms, and other fire protection devices. Locating the projector too close to
a fire protection device creates the risk of mis-operation of the device due to warm air
exhausted from the projector. Also, avoid locating the projector close to fluorescent lights or
other strong light sources. Bright light can shorten the operating range of the remote controller
or even make remote control impossible. When selecting a location for the projector, be sure
to test for proper operation of the remote controller.
The vertical and horizontal orientation of the projected image is reversed from normal when
the projector is positioned upside down for hanging from a ceiling. You need to change the
setup of the projector in order to correct for this. For details, see “Screen Settings 3 Ceiling
Mount” (page 62) under “Setup Menu Settings”.
When affixing the projector to a bracket, be sure to do so in accordance with the conditions
described below.
• Use double-SEMS screws (with washer and spring washer)
• Screw Diameter: M4
• Screw Length: [Washer and Spring Washer Thickness]
+ [Bracket Thickness]
+ [Thread Amount] (L: 5 to 8 mm)
Make sure the screws are the length specified above. Using screws that are
too long can cause damage to your projector. Using screws that are too
short will not provide the strength required for support.
Mounting the Projector on a Wall (XJ-UT Series)
Hanging the Projector from a Ceiling
B