
User Manual
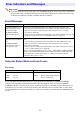

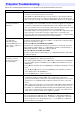
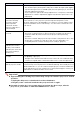

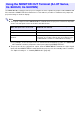
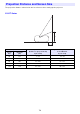
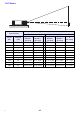
Table Of Contents
- Contents
- Safety Precautions
- Operating Precautions
- Getting Ready
- Unpacking
- Operation Flow to Projection
- General Guide
- Key and Indicator Panel
- Back Terminals
- Placing the Projector on a Desk or on the Floor
- Connecting with Another Device
- Connecting a Computer
- Connecting to a Video Device
- Outputting Audio from the Projector to Another Device
- Connecting a Microphone (XJ-UT Series, XJ-F21XN, XJ-F211WN, XJ-S400UN, XJ-S400WN)
- Connecting to a Network with a LAN Cable (Network Models Only)
- Connecting a Wireless Adapter (Network Models Only)
- LOGO Terminal (Firmware Updates, User Logo Transfers)
- Connecting a Scientific Calculator (Network Models Only)
- SERIAL Terminal (Projector Control Using Commands)
- USB Power
- Cover Included with the YW-41 Wireless Adapter
- Attaching and Removing the Cable Cover (XJ-UT Series)
- Remote Controller
- Operating the Projector
- Turning the Projector On or Off
- Selecting an Input Source (INPUT)
- Using Auto Projection Off
- Basic Image and Audio Operations During Projection
- Flipping the Projected Image Horizontally (Mirror Mode)
- Light Control
- Digital Screen Shift
- Projecting a Template
- Test Pattern Projection
- Control Panel Lock
- Configuring Remote Control ID and Projector ID Settings
- Using the Countdown Timer (TIMER)
- Using the Presentation Timer (TIMER)
- Using the Setup Menu (MENU)
- Using a Password
- Cleaning the Projector
- Troubleshooting
- Appendix
- Supplying USB Power to Another Device
- Mounting the Projector on a Wall (XJ-UT Series)
- Hanging the Projector from a Ceiling
- Using the MONITOR OUT Terminal (XJ-UT Series, XJ-S400UN, XJ-S400WN)
- Projection Distance and Screen Size
- Aspect Ratio Setting and Projection Image
- Supported Signals
- Projector RS-232C Control
- Specifications

74
Important!
Try performing the following steps, which may or may not return the projector to normal
operation.
If normal operation does not resume after you perform the above steps, take the
projector to your retailer or authorized CASIO service center.
Text is blurry. The image may be out of focus. Adjust image focus.
The current frequency and/or phase setting do not match the input signal. (Applies
only when the input source is an RGB signal.) Press the [AUTO] key to execute an
automatic adjustment operation.
On the setup menu, perform the “Image Adjustment 2 3 Frequency” and “Image
Adjustment 2 3 Phase” adjustments. (Applies only when the input source is an
RGB signal.)
Turning on projector power
causes the following
message to appear
“Please input the
password.” and the
projector stands by for
password input.
The “Option Settings 1 3 Password 3 Power On Password” setting on the setup
menu is turned on, so the projector is password protected. Input the correct
password, and then press the [ENTER] key. See page 67. If you are unable to input
the password with the remote controller keys, see “The remote controller does not
work.” below.
The remote controller does
not work.
The remote controller batteries may be dead. Replace the batteries.
The remote controller may be too far from the projector. Make sure the remote
controller is within about five meters from the projector when performing
operations.
The remote control ID and projector ID may not match. Change the two IDs so they
are the same, or change one of the IDs to “All”. For more information, see
“Configuring Remote Control ID and Projector ID Settings” (page 56).
The TEMP or LIGHT
indicator (XJ-UT Series
models), or the STATUS
indicator (XJ-F Series and
XJ-S Series models) is
flashing or lit.
Some error may have occurred. See “Indicator Status When an Error Occurs” (page
71).
The light source unit does
not light.
The light source has been temporarily shut off by pressing the [BLANK] key. Press
the [BLANK] or [ESC] key.
The light source unit has reached the end of its service life or it is malfunctioning.
Contact your original dealer or authorized CASIO service center for replacement.
Power suddenly turns off
and the projector restarts.
The projector periodically performs a self-check operation. In rare cases, the result of
a self-check may cause the projector to restart automatically. This normally does not
indicate malfunction, so you can continue using the projector. However, malfunction
may be indicated if successive restarts keep occurring. If this happens contact your
original dealer or authorized CASIO service center.
1. Unplug the AC power cord and wait for at least 10 minutes.
2. Plug the power cord back in and turn the projector back on again.
Problem Cause and Recommended Action