
User Manual
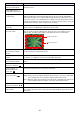

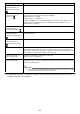
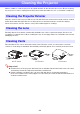
Table Of Contents
- Contents
- Safety Precautions
- Operating Precautions
- Getting Ready
- Unpacking
- Operation Flow to Projection
- General Guide
- Key and Indicator Panel
- Back Terminals
- Placing the Projector on a Desk or on the Floor
- Connecting with Another Device
- Connecting a Computer
- Connecting to a Video Device
- Outputting Audio from the Projector to Another Device
- Connecting a Microphone (XJ-UT Series, XJ-F21XN, XJ-F211WN, XJ-S400UN, XJ-S400WN)
- Connecting to a Network with a LAN Cable (Network Models Only)
- Connecting a Wireless Adapter (Network Models Only)
- LOGO Terminal (Firmware Updates, User Logo Transfers)
- Connecting a Scientific Calculator (Network Models Only)
- SERIAL Terminal (Projector Control Using Commands)
- USB Power
- Cover Included with the YW-41 Wireless Adapter
- Attaching and Removing the Cable Cover (XJ-UT Series)
- Remote Controller
- Operating the Projector
- Turning the Projector On or Off
- Selecting an Input Source (INPUT)
- Using Auto Projection Off
- Basic Image and Audio Operations During Projection
- Flipping the Projected Image Horizontally (Mirror Mode)
- Light Control
- Digital Screen Shift
- Projecting a Template
- Test Pattern Projection
- Control Panel Lock
- Configuring Remote Control ID and Projector ID Settings
- Using the Countdown Timer (TIMER)
- Using the Presentation Timer (TIMER)
- Using the Setup Menu (MENU)
- Using a Password
- Cleaning the Projector
- Troubleshooting
- Appendix
- Supplying USB Power to Another Device
- Mounting the Projector on a Wall (XJ-UT Series)
- Hanging the Projector from a Ceiling
- Using the MONITOR OUT Terminal (XJ-UT Series, XJ-S400UN, XJ-S400WN)
- Projection Distance and Screen Size
- Aspect Ratio Setting and Projection Image
- Supported Signals
- Projector RS-232C Control
- Specifications

69
Cleaning the Projector
Make it a habit to clean the projector at regular intervals as described in this section. Before cleaning
the projector, be sure to unplug it from the power outlet and make sure it is cooled down completely.
Wipe the exterior of the projector with a soft cloth that has been moistened in a weak solution of water
and a mild neutral detergent. Be sure to wring all excess moisture from the cloth before wiping.
Never use benzene, alcohol, thinner, or any other volatile agent for cleaning.
Carefully wipe the lens with a commercially available lens cloth or optical lens paper, like those for
eyeglasses or camera lenses. When cleaning the lens, do not apply undue force and take care to avoid
damaging the lens.
Dust and dirt tend to collect around the intake vents. Because of this, you should use a vacuum
cleaner to clean away accumulated dust and dirt periodically (about once a month) as shown below.
Important!
Continued use of the projector after dust has accumulated around the intake vents can cause
overheating of internal components and lead to malfunction.
Certain operating conditions also can cause dirt and dust to accumulate around the
projector’s exhaust vents. If this happens, use the same procedure as that described above to
clean the exhaust vents.
Cleaning the Projector Exterior
Cleaning the Lens
Cleaning Vents
XJ-UT Series XJ-F Series XJ-S Series