
User Manual
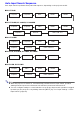
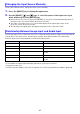
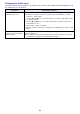
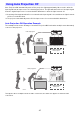

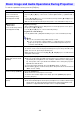
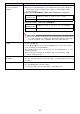
Table Of Contents
- Contents
- Safety Precautions
- Operating Precautions
- Getting Ready
- Unpacking
- Operation Flow to Projection
- General Guide
- Key and Indicator Panel
- Back Terminals
- Placing the Projector on a Desk or on the Floor
- Connecting with Another Device
- Connecting a Computer
- Connecting to a Video Device
- Outputting Audio from the Projector to Another Device
- Connecting a Microphone (XJ-UT Series, XJ-F21XN, XJ-F211WN, XJ-S400UN, XJ-S400WN)
- Connecting to a Network with a LAN Cable (Network Models Only)
- Connecting a Wireless Adapter (Network Models Only)
- LOGO Terminal (Firmware Updates, User Logo Transfers)
- Connecting a Scientific Calculator (Network Models Only)
- SERIAL Terminal (Projector Control Using Commands)
- USB Power
- Cover Included with the YW-41 Wireless Adapter
- Attaching and Removing the Cable Cover (XJ-UT Series)
- Remote Controller
- Operating the Projector
- Turning the Projector On or Off
- Selecting an Input Source (INPUT)
- Using Auto Projection Off
- Basic Image and Audio Operations During Projection
- Flipping the Projected Image Horizontally (Mirror Mode)
- Light Control
- Digital Screen Shift
- Projecting a Template
- Test Pattern Projection
- Control Panel Lock
- Configuring Remote Control ID and Projector ID Settings
- Using the Countdown Timer (TIMER)
- Using the Presentation Timer (TIMER)
- Using the Setup Menu (MENU)
- Using a Password
- Cleaning the Projector
- Troubleshooting
- Appendix
- Supplying USB Power to Another Device
- Mounting the Projector on a Wall (XJ-UT Series)
- Hanging the Projector from a Ceiling
- Using the MONITOR OUT Terminal (XJ-UT Series, XJ-S400UN, XJ-S400WN)
- Projection Distance and Screen Size
- Aspect Ratio Setting and Projection Image
- Supported Signals
- Projector RS-232C Control
- Specifications

50
Change the aspect ratio of
the projected image
(ASPECT)
1. Press the [ASPECT] key.
Each press of the [ASPECT] key cycles between the aspect ratio settings as
shown below. For the meaning of each setting, see “Aspect Ratio Setting
Details” (page 51).
Input source: RGB, HDMI(PC), CASIO USB Tool, Network or Templates
Input source: Video, Component or HDMI(DTV)
Important!
Note that enlarging or reducing the size of an image using the [ASPECT] key
for commercial purposes or public presentation may infringe on the legally
protected copyright of the copyright holder of the original material.
Change the color mode
(FUNC)
1. Press the [FUNC] key. On the menu that appears, select “Color Mode” and then
press the [ENTER] key.
2. Use the [] and [] keys to move the highlighting to the color mode you want to
select, and then press the [ENTER] key.
For details on what each color mode does, see “Image Adjustment 1 3 Color
Mode” (page 60).
The color mode cannot be selected when “Off” is selected for the “Light
Control” setting (page 52).
Adjust the volume level
(VOLUME)
1. Press the [VOLUME +] or [VOLUME –] key to display the “Volume” dialog box.
2. Press the [VOLUME +] key to increase the volume, or the [VOLUME –] key to lower
the volume.
Mute the audio (VOLUME) 1. Press the [VOLUME +] or [VOLUME –] key to display the “Volume” dialog box.
2. Press the [ENTER] key to mute the audio.
3. To restore the audio, press the [VOLUME +] or [VOLUME –] key.
To do this: Perform this operation:
WXGA models
WUXGA models
“Normal” 3 “Full” 3 “16:9” 3 “4:3” 3 “True”
XGA models “Normal” 3 “Full” 3 “16:9” 3 “16:10”
WXGA models
WUXGA models
“Normal” 3 “16:9” 3 “16:10” 3 “4:3” 3 “Letter Box”
XGA models “Normal” 3 “16:9” 3 “16:10” 3 “4:3”