
User Manual

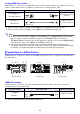

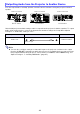

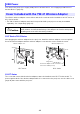

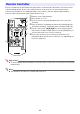
Table Of Contents
- Contents
- Safety Precautions
- Operating Precautions
- Getting Ready
- Unpacking
- Operation Flow to Projection
- General Guide
- Key and Indicator Panel
- Back Terminals
- Placing the Projector on a Desk or on the Floor
- Connecting with Another Device
- Connecting a Computer
- Connecting to a Video Device
- Outputting Audio from the Projector to Another Device
- Connecting a Microphone (XJ-UT Series, XJ-F21XN, XJ-F211WN, XJ-S400UN, XJ-S400WN)
- Connecting to a Network with a LAN Cable (Network Models Only)
- Connecting a Wireless Adapter (Network Models Only)
- LOGO Terminal (Firmware Updates, User Logo Transfers)
- Connecting a Scientific Calculator (Network Models Only)
- SERIAL Terminal (Projector Control Using Commands)
- USB Power
- Cover Included with the YW-41 Wireless Adapter
- Attaching and Removing the Cable Cover (XJ-UT Series)
- Remote Controller
- Operating the Projector
- Turning the Projector On or Off
- Selecting an Input Source (INPUT)
- Using Auto Projection Off
- Basic Image and Audio Operations During Projection
- Flipping the Projected Image Horizontally (Mirror Mode)
- Light Control
- Digital Screen Shift
- Projecting a Template
- Test Pattern Projection
- Control Panel Lock
- Configuring Remote Control ID and Projector ID Settings
- Using the Countdown Timer (TIMER)
- Using the Presentation Timer (TIMER)
- Using the Setup Menu (MENU)
- Using a Password
- Cleaning the Projector
- Troubleshooting
- Appendix
- Supplying USB Power to Another Device
- Mounting the Projector on a Wall (XJ-UT Series)
- Hanging the Projector from a Ceiling
- Using the MONITOR OUT Terminal (XJ-UT Series, XJ-S400UN, XJ-S400WN)
- Projection Distance and Screen Size
- Aspect Ratio Setting and Projection Image
- Supported Signals
- Projector RS-232C Control
- Specifications

35
Connecting a microphone to the projector’s MIC terminal makes it possible to output microphone
input through the projector’s speaker.
Use this terminal to connect a dynamic microphone.
Plug-in power type microphones are not supported.
If you have a network model projector, you can use a LAN cable to connect it to the network hub or
another device of an existing network. Use a 100BASE-TX or 10BASE-T standard Category 5 or higher
LAN cable for connection. Use of a shielded (STP) cable is recommended.
After connecting the projector to a network, you will be able to project the screen of any computer on
the network. You also will be able to control the projector and configure its settings from a computer.
For details, see the separate “Network Function Guide”.
Connecting a Microphone (XJ-UT Series, XJ-F21XN, XJ-F211WN,
XJ-S400UN, XJ-S400WN)
XJ-UT Series XJ-F21XN, XJ-F211WN XJ-S400UN, XJ-S400WN
Connecting to a Network with a LAN Cable (Network Models
Only)
XJ-UT312WN, XJ-UT352WN XJ-F21XN, XJ-F211WN XJ-S400UN, XJ-S400WN
Projector Terminal Connection Cable Other Device Terminal
LAN LAN terminal (RJ-45)
MIC terminal
MIC terminal
MIC terminal
MIC terminal
Mini jack
LAN terminal
LAN terminal
LAN terminal
LAN cable
RJ-45 RJ-45