
User Manual
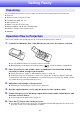

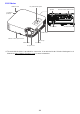

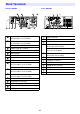
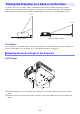
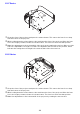
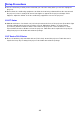
Table Of Contents
- Contents
- Safety Precautions
- Operating Precautions
- Getting Ready
- Unpacking
- Operation Flow to Projection
- General Guide
- Key and Indicator Panel
- Back Terminals
- Placing the Projector on a Desk or on the Floor
- Connecting with Another Device
- Connecting a Computer
- Connecting to a Video Device
- Outputting Audio from the Projector to Another Device
- Connecting a Microphone (XJ-UT Series, XJ-F21XN, XJ-F211WN, XJ-S400UN, XJ-S400WN)
- Connecting to a Network with a LAN Cable (Network Models Only)
- Connecting a Wireless Adapter (Network Models Only)
- LOGO Terminal (Firmware Updates, User Logo Transfers)
- Connecting a Scientific Calculator (Network Models Only)
- SERIAL Terminal (Projector Control Using Commands)
- USB Power
- Cover Included with the YW-41 Wireless Adapter
- Attaching and Removing the Cable Cover (XJ-UT Series)
- Remote Controller
- Operating the Projector
- Turning the Projector On or Off
- Selecting an Input Source (INPUT)
- Using Auto Projection Off
- Basic Image and Audio Operations During Projection
- Flipping the Projected Image Horizontally (Mirror Mode)
- Light Control
- Digital Screen Shift
- Projecting a Template
- Test Pattern Projection
- Control Panel Lock
- Configuring Remote Control ID and Projector ID Settings
- Using the Countdown Timer (TIMER)
- Using the Presentation Timer (TIMER)
- Using the Setup Menu (MENU)
- Using a Password
- Cleaning the Projector
- Troubleshooting
- Appendix
- Supplying USB Power to Another Device
- Mounting the Projector on a Wall (XJ-UT Series)
- Hanging the Projector from a Ceiling
- Using the MONITOR OUT Terminal (XJ-UT Series, XJ-S400UN, XJ-S400WN)
- Projection Distance and Screen Size
- Aspect Ratio Setting and Projection Image
- Supported Signals
- Projector RS-232C Control
- Specifications

21
Getting Ready
As you unpack the projector, check to make sure that all of the items listed below are present.
Projector
Wireless remote controller YT-161
Test Batteries (AAA-size × 2)
AC Power Cord
Cable cover (XJ-UT Series only)
Wireless adapter YW-41 (XJ-UT312WN only)
“Where to find the User’s Guide” sheet
Warranty
This section explains the operational flow up to the point that projection is started.
1.
Load the test batteries that come with the projector into the remote controller.
Use only alkaline batteries to power the remote controller.
Orient batteries as shown by the polarity figures ( ) inside the battery compartment.
2.
Place the projector onto a table, desk, or stand that is level and firm, making
sure that you allow enough room around it.
“Safety Precautions” (page 7), “Operating Precautions” (page 13)
“Placing the Projector on a Desk or on the Floor” (page 28), “Setup Precautions” (page 30)
You will need to purchase special hardware to mount this projector on a wall. For details, contact
the retailer where you purchased the projector.
3.
Adjust the vertical angle of the projector.
“Adjusting the Vertical Angle of the Projector” (page 28)
4.
Use the supplied power cord to plug the projector into a power outlet.
5.
Connect the projector to an image output device and/or audio output device, and
then turn on each device.
“Connecting with Another Device” (page 31)
6.
Press the [P] key to turn on the projector.
The first time you turn on the projector, a “Language” window will appear in the center of the
projection screen. Select the language you want.
Unpacking
Operation Flow to Projection