
User Manual


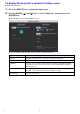


Table Of Contents
- Contents
- Establishing a Network Connection Between the Projector and a Computer
- Establishing a Direct Wireless LAN Connection Between a Computer and the Projector
- Using a Wired LAN Connection to Connect the Projector to an Existing Network
- Connecting the Projector to an Existing Wireless LAN Access Point
- Using the Projector as a NAT Router (Simultaneous Use of Wireless LAN and Wired LAN)
- Using the Remote Controller to Configure Projector Network Settings
- Using a Computer to Configure Projector Network Settings
- Preparing for C-Connection
- Network Projecting a Computer Screen Image (Using C-Connection)
- C-Connection Details
- Advanced Operations
- Controlling the Projector from an External Network Device
- Ports Used for TCP/UDP

9
To display the projector’s wired LAN information screen
Projector Operation
1.
Press the [MENU] key to display the setup menu.
2.
Select the following in sequence: “Network Settings” 3 “Wired LAN info”. Next,
press the [ENTER] key.
This displays the Wired LAN info screen.
The information that appears on the screen is explained below.
This item: Shows this:
Projector name This projector’s name (page 30)
MAC Address MAC address (physical address) of the wired LAN board of this projector
IP Address This projector’s LAN1 IP address (page 27)
Subnet Mask This projector’s LAN1 subnet mask
Default Gateway This projector’s LAN1 default gateway
Access Filter Access Filter (page 29) setting