
User Manual


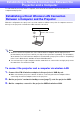


Table Of Contents
- Contents
- Establishing a Network Connection Between the Projector and a Computer
- Establishing a Direct Wireless LAN Connection Between a Computer and the Projector
- Using a Wired LAN Connection to Connect the Projector to an Existing Network
- Connecting the Projector to an Existing Wireless LAN Access Point
- Using the Projector as a NAT Router (Simultaneous Use of Wireless LAN and Wired LAN)
- Using the Remote Controller to Configure Projector Network Settings
- Using a Computer to Configure Projector Network Settings
- Preparing for C-Connection
- Network Projecting a Computer Screen Image (Using C-Connection)
- C-Connection Details
- Advanced Operations
- Controlling the Projector from an External Network Device
- Ports Used for TCP/UDP

8
You can use a LAN cable to connect the projector to an existing network.
To use a wired LAN connection to connect the projector to an
existing network that has a DHCP server
1.
Use a LAN cable to connect the projector to the existing network.
2.
Display the projector’s wired LAN information screen (page 9), and use it to
confirm that the projector is correctly connected to the network.
To use a wired LAN connection to connect the projector to an
existing network with a fixed IP
1.
Use a LAN cable to connect the projector to the existing network.
2.
Specify the projector’s fixed IP.
Projector Operation
(1) Press the [MENU] key to display the setup menu.
(2) Select the following in sequence: “Network Settings” 3 “Network Settings”. Next, press the
[ENTER] key.
(3) Confirm that “IP Setting(LAN1)” is selected, and then press [W] or [X] to select “Manual”.
(4) Input the applicable information for the “IP Address”, “Subnet Mask”, and “Default Gateway”
settings.
(5) Select “Update Network Settings” and then press the [ENTER] key.
(6) Use the [S] and [T] keys to select “Yes”, and then press the [ENTER] key.
This restarts the network system. Restarting updates settings and then displays the network
standby screen.
3.
Display the projector’s wired LAN information screen (page 9), and use it to
confirm that the projector is correctly connected to the network.
Note
If you need to configure DNS server settings, use the projector’s Web Service page. See “To
configure projector settings” (page 21) for more information.
Using a Wired LAN Connection to Connect the
Projector to an Existing Network
Wired LAN connection
Existing network
LAN connection
Projector
Router