
User Manual
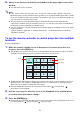
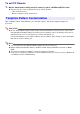


Table Of Contents
- Contents
- Establishing a Network Connection Between the Projector and a Computer
- Establishing a Direct Wireless LAN Connection Between a Computer and the Projector
- Using a Wired LAN Connection to Connect the Projector to an Existing Network
- Connecting the Projector to an Existing Wireless LAN Access Point
- Using the Projector as a NAT Router (Simultaneous Use of Wireless LAN and Wired LAN)
- Using the Remote Controller to Configure Projector Network Settings
- Using a Computer to Configure Projector Network Settings
- Preparing for C-Connection
- Network Projecting a Computer Screen Image (Using C-Connection)
- C-Connection Details
- Advanced Operations
- Controlling the Projector from an External Network Device
- Ports Used for TCP/UDP

59
Ports Used for TCP/UDP
C-Connection and MirrorOP Presenter use the network ports shown in the table below for projection
functions and PC Remote functions. As required, check to make sure that your network firewall or
personal firewall of your environment is configured accordingly.
PJLink uses the network ports shown in the table below. Check the settings of the network firewall or
personal firewall of your environment as required to ensure there are no problems.
Port Type Port No. Network Projection PC Remote
TCP Port 1234 c
389 c
3268 c
515 c
8080 c
18765 c
UDP Port 5353 c
54022 c
1900 cc
18676 c
Port Type Port No. Use
TCP Port 4352 Control port
UDP Port 4352 Search port
B