
User Manual
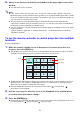


Table Of Contents
- Contents
- Establishing a Network Connection Between the Projector and a Computer
- Establishing a Direct Wireless LAN Connection Between a Computer and the Projector
- Using a Wired LAN Connection to Connect the Projector to an Existing Network
- Connecting the Projector to an Existing Wireless LAN Access Point
- Using the Projector as a NAT Router (Simultaneous Use of Wireless LAN and Wired LAN)
- Using the Remote Controller to Configure Projector Network Settings
- Using a Computer to Configure Projector Network Settings
- Preparing for C-Connection
- Network Projecting a Computer Screen Image (Using C-Connection)
- C-Connection Details
- Advanced Operations
- Controlling the Projector from an External Network Device
- Ports Used for TCP/UDP

56
To rename a folder
Important!
When inputting a folder name with the procedure below, keep the name short enough to fit in
the folder name box. Inputting a name that completely fills the input box or that does not fit in
the input box can cause the end of the name to be cut off when displayed on the template
selection screen.
1.
Perform steps 1 and 2 of the procedure under “To add or delete a template
image” (page 55).
2.
Click the folder name box of the folder you want to rename.
3.
Input the new folder name and then click the [Save changes] button.
To cancel your change, click the [Logout] button in place of [Save changes].