
User Manual
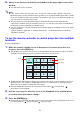


Table Of Contents
- Contents
- Establishing a Network Connection Between the Projector and a Computer
- Establishing a Direct Wireless LAN Connection Between a Computer and the Projector
- Using a Wired LAN Connection to Connect the Projector to an Existing Network
- Connecting the Projector to an Existing Wireless LAN Access Point
- Using the Projector as a NAT Router (Simultaneous Use of Wireless LAN and Wired LAN)
- Using the Remote Controller to Configure Projector Network Settings
- Using a Computer to Configure Projector Network Settings
- Preparing for C-Connection
- Network Projecting a Computer Screen Image (Using C-Connection)
- C-Connection Details
- Advanced Operations
- Controlling the Projector from an External Network Device
- Ports Used for TCP/UDP

55
To add or delete a template image
1.
Use the computer to display the projector’s Web Service page (page 19).
2.
Input the password into the “Template Pattern Customization” box, and then
click the [Login] button.
The initial default password is: moderator.
3.
Click the folder whose content you want to change or check.
This displays the template editing page.
The contents of the first folder (projector built-in templates) can be browsed only. This folder
and its contents cannot be modified or deleted.
4.
Add or delete a template image.
5.
To apply the changes you have made on the template editing page, click the
[Save changes] button.
6.
To return to the folder selection page, click “back”.
7.
After you are finished, click the [Logout] button in the title bar of the window.
This will return to the top menu.
To do this: Perform this operation:
Add an image 1. Click the [Choose Image] button.
2. On the select file dialog box that appears, select the image file you want to add
as a template, and then click the [Open] button.
Note
Up to nine images can be added to a folder.
Delete an image 1. Move the mouse cursor to the image you want to delete.
2. Click the trash icon.
3. On the confirmation dialog box that appears, click the [Yes. Delete the overlay.]
button.
Replace an image 1. Move the mouse cursor to the image you want to delete.
2. Click the [Change Image] button.
3. On the select file dialog box that appears, select the image file you want to use
to replace the current image, and then click the [Open] button.