
User Manual
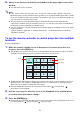


Table Of Contents
- Contents
- Establishing a Network Connection Between the Projector and a Computer
- Establishing a Direct Wireless LAN Connection Between a Computer and the Projector
- Using a Wired LAN Connection to Connect the Projector to an Existing Network
- Connecting the Projector to an Existing Wireless LAN Access Point
- Using the Projector as a NAT Router (Simultaneous Use of Wireless LAN and Wired LAN)
- Using the Remote Controller to Configure Projector Network Settings
- Using a Computer to Configure Projector Network Settings
- Preparing for C-Connection
- Network Projecting a Computer Screen Image (Using C-Connection)
- C-Connection Details
- Advanced Operations
- Controlling the Projector from an External Network Device
- Ports Used for TCP/UDP

54
To exit PC Remote
1.
On the smart device being used for remote control, exit MirrorOp Receiver.
Execute any one of the operations below to exit PC Remote.
– Turn off the projector.
– On the computer, exit C-Connection.
With Template Pattern Customization, you can add, replace, and delete template images for
projection.
Important!
Do not add template images that include personal information to this projector. There is the
risk that added template images stored in projector memory can be viewed by others due to
unauthorized access, or if the projector is stolen, discarded, etc.
Personal information is your name, address, phone number, date of birth, or other information
that can be used to identify you.
Note
You can have up to 81 added template images in projector memory.
Images added as templates must be JPG file format, with a maximum resolution of 4096 x
2160.
The projector’s built-in templates cannot be replaced or deleted.
For projector operations required to control template projection, refer to the User’s Guide that
is available from the CASIO website.
Template Pattern Customization