
User Manual
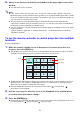
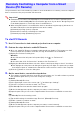
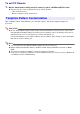


Table Of Contents
- Contents
- Establishing a Network Connection Between the Projector and a Computer
- Establishing a Direct Wireless LAN Connection Between a Computer and the Projector
- Using a Wired LAN Connection to Connect the Projector to an Existing Network
- Connecting the Projector to an Existing Wireless LAN Access Point
- Using the Projector as a NAT Router (Simultaneous Use of Wireless LAN and Wired LAN)
- Using the Remote Controller to Configure Projector Network Settings
- Using a Computer to Configure Projector Network Settings
- Preparing for C-Connection
- Network Projecting a Computer Screen Image (Using C-Connection)
- C-Connection Details
- Advanced Operations
- Controlling the Projector from an External Network Device
- Ports Used for TCP/UDP

52
4.
Repeat steps 2 and 3 as required.
Projection can be performed from as many as four terminals at the same time.
5.
To exit the user list screen press the [ESC] key.
This will start projection from all terminals for which (projecting) was selected.
If the status of all terminals becomes (not projecting), the network standby screen will
appear.
Projector Remote lets you perform projector operations remotely from a computer.
To perform projector operations from a computer
1.
Use the computer to display the projector’s Web Service page (page 19).
2.
Input the password into the “Projector Remote” box, and then click the [Login]
button.
The initial default password is: moderator.
3.
Use the buttons in the displayed window to control the projector.
4.
After you are finished, click the [Logout] button in the title bar of the window.
This will return to the top menu.
Note
The power button of the Projector Remote window cannot be used to turn on the projector.
Projector Remote