
User Manual
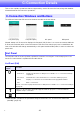


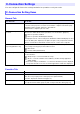


Table Of Contents
- Contents
- Establishing a Network Connection Between the Projector and a Computer
- Establishing a Direct Wireless LAN Connection Between a Computer and the Projector
- Using a Wired LAN Connection to Connect the Projector to an Existing Network
- Connecting the Projector to an Existing Wireless LAN Access Point
- Using the Projector as a NAT Router (Simultaneous Use of Wireless LAN and Wired LAN)
- Using the Remote Controller to Configure Projector Network Settings
- Using a Computer to Configure Projector Network Settings
- Preparing for C-Connection
- Network Projecting a Computer Screen Image (Using C-Connection)
- C-Connection Details
- Advanced Operations
- Controlling the Projector from an External Network Device
- Ports Used for TCP/UDP

43
Mini Panel
Info Panel and Mini Panel Common Buttons
Clicking this
button:
Does this:
Switches to the info panel.
Switches to the list panel (mini).
Clicking this
button:
Does this:
Toggles the projection layout between “Auto Layout” and “Full Screen”. For details, see
“Simultaneous Projection of Images from Multiple Computers on a Single Projector” (page 40).
Starts computer screen projection.
Stops computer screen projection.
Pauses computer screen image projection, which freezes the currently displayed image.
Toggles the computer audio output to the projector between mute ( ) and unmute ( ).
× Exits C-Connection.