
User Manual


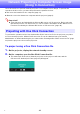
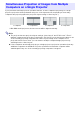
Table Of Contents
- Contents
- Establishing a Network Connection Between the Projector and a Computer
- Establishing a Direct Wireless LAN Connection Between a Computer and the Projector
- Using a Wired LAN Connection to Connect the Projector to an Existing Network
- Connecting the Projector to an Existing Wireless LAN Access Point
- Using the Projector as a NAT Router (Simultaneous Use of Wireless LAN and Wired LAN)
- Using the Remote Controller to Configure Projector Network Settings
- Using a Computer to Configure Projector Network Settings
- Preparing for C-Connection
- Network Projecting a Computer Screen Image (Using C-Connection)
- C-Connection Details
- Advanced Operations
- Controlling the Projector from an External Network Device
- Ports Used for TCP/UDP

40
If you perform a network projection operation with two or more computers projecting on a single
projector, projection will be performed using one of the layouts below, depending on how many
computers are projecting (when the projection layout setting is “Auto Layout”.).
* With XGA model projectors, the two screens will be aligned vertically.
Note
The projector has two projection layout settings: “Auto Layout” and “Full Screen”. Even if
multiple computers are projecting, selecting the “Full Screen” projection layout setting on one
of the currently projecting computers will cause only the image of the computer to be
projected in a full-screen view. You can return to multiple computer image projection by
switching back to “Auto Layout”.
If four computers are already projecting to a single projector, projection operations from any
additional computers are disabled. Projection operations from another computer will be
enabled again if any one of the currently projecting computers is stopped.
Simultaneous Projection of Images from Multiple
Computers on a Single Projector
1 computer 2 computers* 3 computers 4 computers