
User Manual
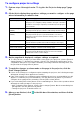


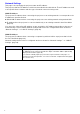
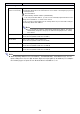

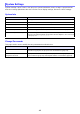
Table Of Contents
- Contents
- Establishing a Network Connection Between the Projector and a Computer
- Establishing a Direct Wireless LAN Connection Between a Computer and the Projector
- Using a Wired LAN Connection to Connect the Projector to an Existing Network
- Connecting the Projector to an Existing Wireless LAN Access Point
- Using the Projector as a NAT Router (Simultaneous Use of Wireless LAN and Wired LAN)
- Using the Remote Controller to Configure Projector Network Settings
- Using a Computer to Configure Projector Network Settings
- Preparing for C-Connection
- Network Projecting a Computer Screen Image (Using C-Connection)
- C-Connection Details
- Advanced Operations
- Controlling the Projector from an External Network Device
- Ports Used for TCP/UDP

29
Note
When inputting addresses for “IP Address”, “DHCP Server Start Address”, “DHCP Server End
Address”, and “DNS Server”, do not input leading zeros for one-digit and two-digit octets (xxx
parts of an address). For example, the following types of input are not allowed: 029 for 29, 005
for 5, etc.
Use this item: To do this:
LAN2 IP Settings
IP Address Input an IP address of the format below when using the projector as a wireless LAN
access point.
xxx.xxx.xxx.xxx (Initial Default: 192.168.100.10)
DHCP Server Start
Address
DHCP Server End
Address
Specify the start and end of the range of IP addresses to be automatically assigned to a
computer or smart device connecting to the projector via wireless LAN. Each address
must be the format below.
xxx.xxx.xxx.xxx (Initial Default: 192.168.100.11 to 192.168.100.200)
Regardless of the value that is input for “Subnet Mask” below, the first three octets
(Initial Default: 192.168.100) of the start and end addresses must be the same.
Subnet Mask Input a subnet mask of the format below.
xxx.xxx.xxx.xxx (Initial Default: 255.255.255.0)
DNS Server Input a DNS server IP address of the format below.
xxx.xxx.xxx.xxx (Initial Default: 192.168.100.10)
Access Filter Configure settings to control wireless LAN side and wired LAN side communications
when using the projector as a NAT router (page 13).
Pass (initial default setting): Allow all computers and/or smart devices connected to the
wireless LAN (access point side) to access the wired LAN local network and the
internet.
Block: Block all computers and/or smart devices connected to the wireless LAN
(access point side) from accessing the wired LAN.
Internet only: Allow computers and/or smart devices connected to the wireless LAN
side (Access Point Mode side) to access the wired LAN side network, including the
internet, for HTTP communication only.