
User Manual


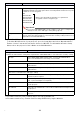
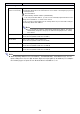

Table Of Contents
- Contents
- Establishing a Network Connection Between the Projector and a Computer
- Establishing a Direct Wireless LAN Connection Between a Computer and the Projector
- Using a Wired LAN Connection to Connect the Projector to an Existing Network
- Connecting the Projector to an Existing Wireless LAN Access Point
- Using the Projector as a NAT Router (Simultaneous Use of Wireless LAN and Wired LAN)
- Using the Remote Controller to Configure Projector Network Settings
- Using a Computer to Configure Projector Network Settings
- Preparing for C-Connection
- Network Projecting a Computer Screen Image (Using C-Connection)
- C-Connection Details
- Advanced Operations
- Controlling the Projector from an External Network Device
- Ports Used for TCP/UDP

21
To configure projector settings
1.
Perform steps 1 through 3 under “To log into the Projector Setup page” (page
20).
2.
Click a link to display the page whose settings you want to configure or the page
whose information you want to view.
3.
On the page that is displayed, configure settings as required.
To cancel all of the changes you have made on the page to the projector, click the [Discard
changes] button. To discard your changes, click the [Yes. Refresh the page] button on the
confirmation dialog box. If you want to maintain your changes without canceling them, click
the [No. Cancel the page refresh.] button.
4.
To apply the changes you have made on the page to the projector, click the
[Save changes] button.
If none of the settings you configured require restarting the projector, the following message
will appear: “Changes were applied successfully.”.
If any of the settings you configured require restarting the projector, a restart dialog box will
appear. To restart the projector immediately, click the [Reboot now] button. If you want to
configure other settings before restarting, click the [Reboot later] button.
If you clicked the [Reboot later] button on the restart dialog box, either of the operations below
will apply the setting changes to the projector.
– After configuring other settings, click the [Save changes] button. On the restart dialog box
that appears, click the [Reboot now] button.
– Turning the projector off and then back on.
5.
After you are finished, click in the title bar of the window, and then click the
[Home] button.
Click this: To go to this page: For more:
Login Settings (sidebar) Login Settings page
This page is for configuring settings related to the login code that is
used when connecting a computer (or smart device) to the projector
over a network.
Page 23
Network Settings
(sidebar)
Network Settings page
This page includes projector wireless LAN settings and IP settings.
Page 24
System Settings
(sidebar)
System Settings page
This page includes projector system information, a section to
change the login password, and other settings (same as “Other
Settings” below).
Page 30
Update (sidebar) Update page
Includes Firmware Update and Troubleshooting (For Developer).
Page 31
System Info System Settings 3 System Info page Page 30
Wireless LAN Settings Network Settings 3 Wireless LAN Settings page Page 24
Other Settings System Settings 3 Other Settings page
This page includes Moderator function user list screen display
settings and Crestron control settings.
Page 31