
User Manual

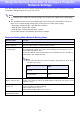


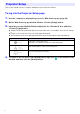
Table Of Contents
- Contents
- Establishing a Network Connection Between the Projector and a Computer
- Establishing a Direct Wireless LAN Connection Between a Computer and the Projector
- Using a Wired LAN Connection to Connect the Projector to an Existing Network
- Connecting the Projector to an Existing Wireless LAN Access Point
- Using the Projector as a NAT Router (Simultaneous Use of Wireless LAN and Wired LAN)
- Using the Remote Controller to Configure Projector Network Settings
- Using a Computer to Configure Projector Network Settings
- Preparing for C-Connection
- Network Projecting a Computer Screen Image (Using C-Connection)
- C-Connection Details
- Advanced Operations
- Controlling the Projector from an External Network Device
- Ports Used for TCP/UDP

20
This section explains how to configure detailed projector network settings.
To log into the Projector Setup page
1.
Use the computer to display the projector’s Web Service page (page 19).
2.
On the Web Service page window title bar, click the [Setup] button.
3.
Input the password (Initial Default: admin) into the “Password” box, and then
click the [Login] button.
“admin” will be input automatically as the user name in the “User Name” box. Do not change
it.
If login is successful, the Projector Setup page will appear.
The meanings of the icons that appear at the bottom of this page are described below.
4.
To return to the top menu of the Web Service page, click in the title bar of the
window, and then click the [Home] button.
Projector Setup
Icon and Text Description
SSID of the connected projector.
Clicking this icon displays the Wireless LAN Settings page.
Name and IP address of the connected projector.
Projector network projection status
B