
User Manual

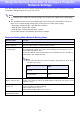
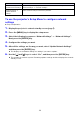
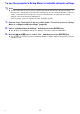


Table Of Contents
- Contents
- Establishing a Network Connection Between the Projector and a Computer
- Establishing a Direct Wireless LAN Connection Between a Computer and the Projector
- Using a Wired LAN Connection to Connect the Projector to an Existing Network
- Connecting the Projector to an Existing Wireless LAN Access Point
- Using the Projector as a NAT Router (Simultaneous Use of Wireless LAN and Wired LAN)
- Using the Remote Controller to Configure Projector Network Settings
- Using a Computer to Configure Projector Network Settings
- Preparing for C-Connection
- Network Projecting a Computer Screen Image (Using C-Connection)
- C-Connection Details
- Advanced Operations
- Controlling the Projector from an External Network Device
- Ports Used for TCP/UDP

18
Using a Computer to Configure Projector Network
Settings
You can use the web browser of a computer to access the projector’s Web Service page in order to
configure projector network settings and to perform various other operations.
Displaying the Web Service page first displays the top menu shown below.
Web Service Page Top Menu
1
[Setup] button
Click to access the projector network
detailed settings.
2
Language selection button
Click to display a list of languages and select
the one you want to use for the Web Service
page.
3
Function login menu
This menu accesses the Moderator (page
49), Projector Remote (page 52), and
Template Pattern Customization (page 54)
function pages.
4
One Click Connection File
See “Creating a One Click Connection File”
(page 32).
5
Links to connection applications
These are download links to C-Connection
of a computer and MirrorOp Presenter for
smart devices.
1
3
4
5
2