
User Manual
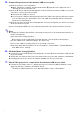

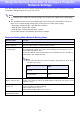


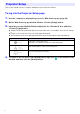
Table Of Contents
- Contents
- Establishing a Network Connection Between the Projector and a Computer
- Establishing a Direct Wireless LAN Connection Between a Computer and the Projector
- Using a Wired LAN Connection to Connect the Projector to an Existing Network
- Connecting the Projector to an Existing Wireless LAN Access Point
- Using the Projector as a NAT Router (Simultaneous Use of Wireless LAN and Wired LAN)
- Using the Remote Controller to Configure Projector Network Settings
- Using a Computer to Configure Projector Network Settings
- Preparing for C-Connection
- Network Projecting a Computer Screen Image (Using C-Connection)
- C-Connection Details
- Advanced Operations
- Controlling the Projector from an External Network Device
- Ports Used for TCP/UDP

16
To use the projector’s Setup Menu to configure network
settings
Projector Operation
1.
Display the projector’s network standby screen (page 7).
2.
Press the [MENU] key to display the setup menu.
3.
Select the following in sequence: “Network Settings” 3 “Network Settings”.
Next, press the [ENTER] key.
4.
Configure the settings you want.
5.
After all the settings are the way you want, select “Update Network Settings”
and then press the [ENTER] key.
This displays a confirmation dialog box asking if you want to update.
6.
Use the [S] and [T] keys to select “Yes”, and then press the [ENTER] key.
This restarts the network system. Restarting updates settings and then displays the network
standby screen.
Network Settings 3
Update Network Settings
Applies changes to the projector that were made to the menu setting items included in
“Network Settings” 3 “Network Settings”.
Network Settings 3
Initialize Network
Settings
Returns network settings to their factory defaults.
This menu item: Does this: